Stocky Wordpress Theme Documentation
- Created On: 7/8/2014
- Last Changed: 21/12/2022
- Current Version: 2.1
- Developed By: Scube Themes
- Theme Support: https://www.scube.co/support/
- Plugin Support: https://easydigitaldownloads.com/support/
Introduction
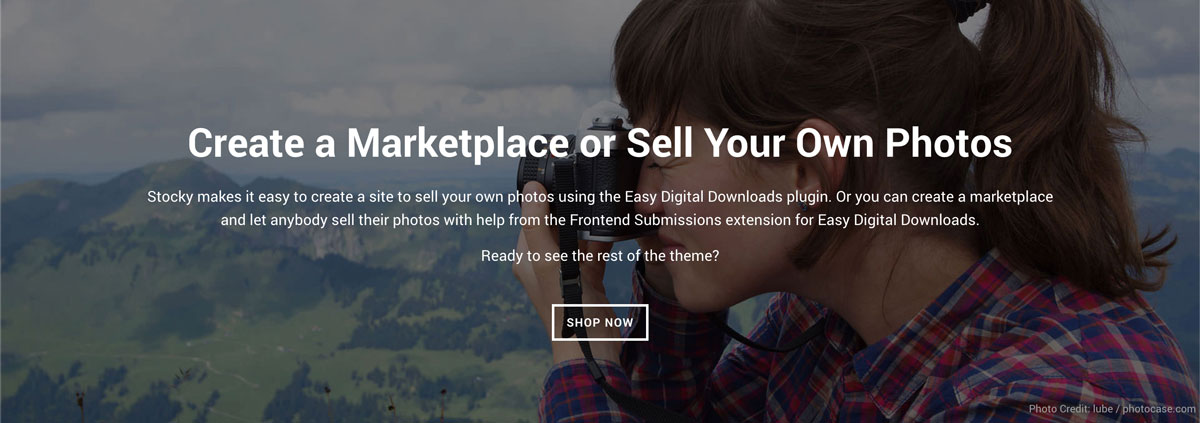
Built on WordPress and Easy Digital Downloads, Stocky allows you to sell your photos just the same as any giant online marketplace. Not only can you sell your products, but with the available extensions in an EDD Pass you can allow anybody to upload their photos and sell through your site.
Thank you for purchasing the theme. We provide support for all of our themes at https://www.scube.co/support/, but please make sure you read this documentation in it's entirety first. For support on the Easy Digital Downloads plugin please visit https://easydigitaldownloads.com/support/. Thanks again!
Theme Installation
Download Theme
At first, you need to download Stocky theme from ThemeForest website.
To download the theme:
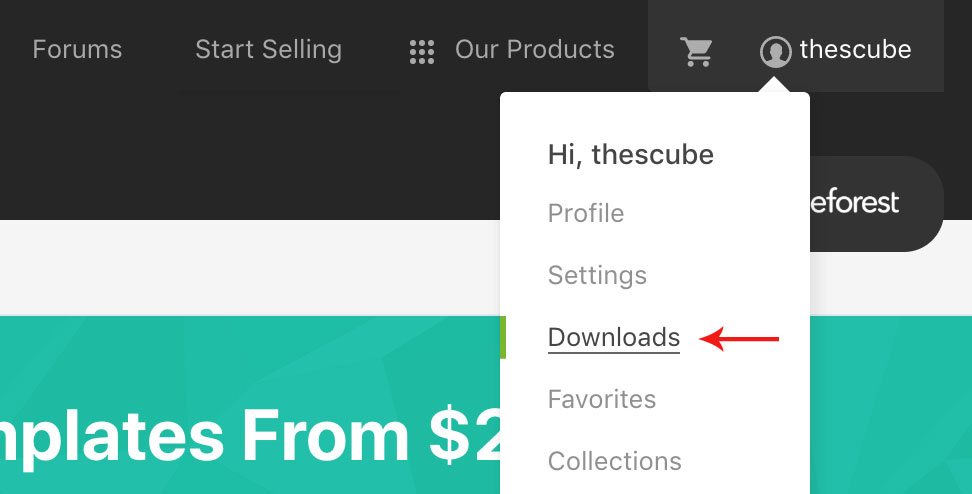
- Go to ThemeForest and login into your account.
- In the upper right corner, hover over your username and click on Downloads.
- Scroll down to Stocky and click on Download All files & documentation.
- Extract the downloaded .zip file into a folder. These files will be needed for the next steps.

Installing The Theme
There are few methods to upload and install a theme on your WordPress website. We explain about two easy installation methods here.
Installing through WordPress
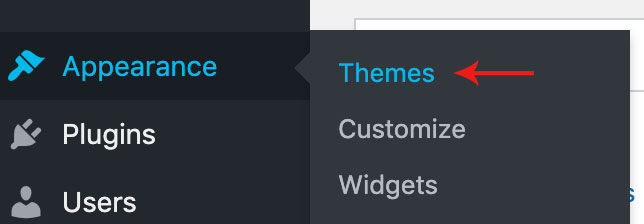
- On WordPress left menu, go to Appearance > Themes.
- Click on Add New Theme.
- Click on Upload Theme button.
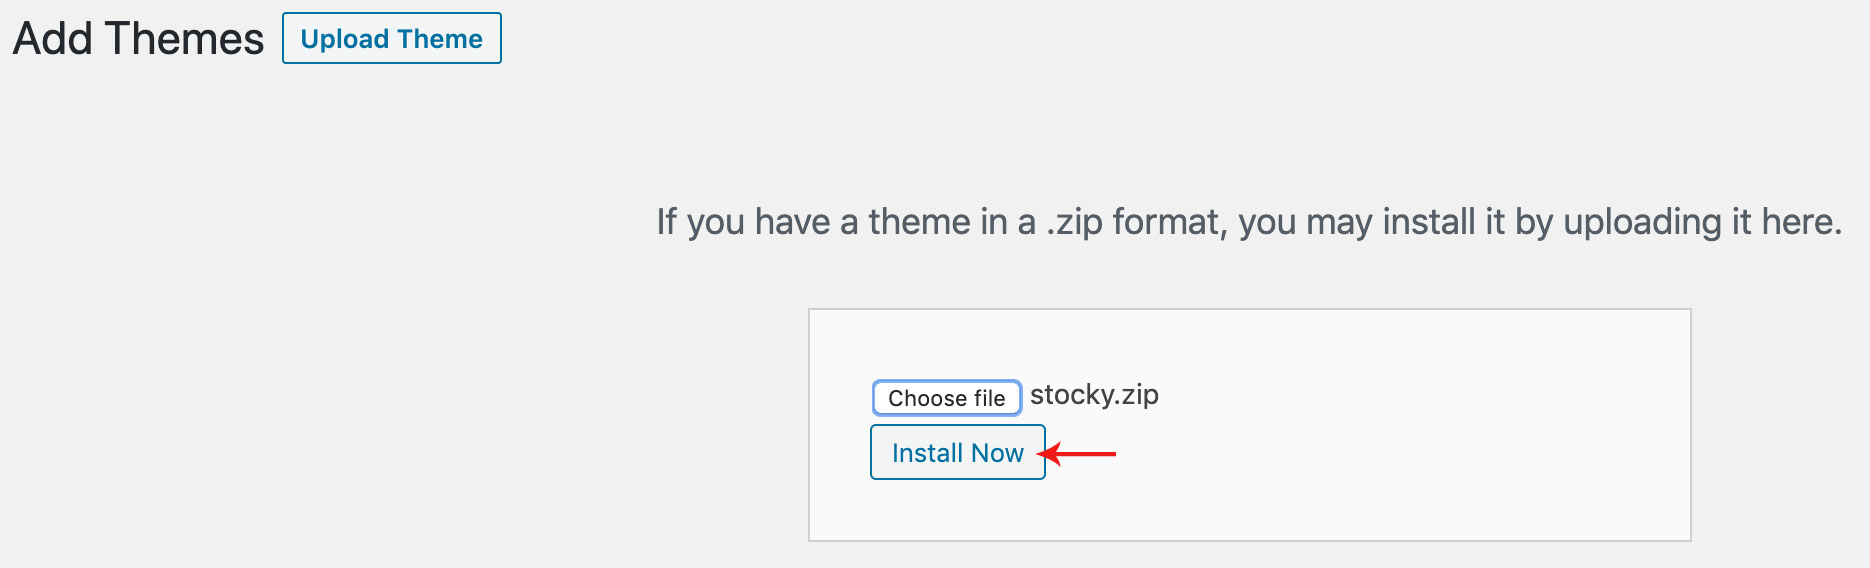
- Click on Choose File button and select Stocky.zip that you have extracted from the ThemeForest downloaded file then click on Install Now button and wait for the install to complete.
- After the theme installed successfully, click on Activate button.


Uploading Through FTP
Alternatively, you can upload the theme through file transfer protocol. Keep in mind that this will only upload the theme to your website, it will not activate it.
- Use a FTP (for example Filezilla) to access your host web server.
- In the files browser navigate to /wp-content/themes.
- Extract Stocky.zip and Transfer it into the directory.
Installing The Child Theme
If you plan on customizing and editing the theme’s files, it is always recommended to install a child theme. Having a child theme guarantees that your changes will not be deleted on each update of the theme and they will stay intact.
Use the same process of Installing the theme to install the child theme.
Install Required Plugins
After successfully activated the child theme. Its important to install and activate the required plugins for the theme.
There are 2 required plugins for Stocky theme version 2.1
- Easy Digital Downloads plugin
- Options Framework plugin
Install & Activate Required Plugins
- When theme is activated, Notice to install the required plugins will appear on the Wordpress backend.
- Click on the Begin installing plugins link to install and then activate the plugins.

Theme Recommended Plugins
- One Click Demo Import: This plugin is used to import the demo content. It includes pages, posts, medias, downloads (products), menus and widgets. You need to install and activate this plugin to import the demo content (this is not mandatory).
- Contact form 7: We used Contact form 7 (CF7) plugin to add contact form on contact page. You need to install and activate this plugin before importing the demo file (this is not mandatory). Click here to see the plugin.
EDD Recommended Plugins
In demo website, we have used few EDD plugins to enhance the features.
- EDD Wish Lists: This is an addon for EDD Plugin which provides customers the ability to save and share their favorite products on your site. Click here to know more about the plugin.
- EDD Reviews: This adds the option for product Reviews. The Customer can provide feedback to the products. Click here to know more about the plugin.
- Recommended Products: This addon plugin shows recommended products based on other customer purchases. It allows you to show a cross sell of recommended products when viewing downloads or the checkout screens. Click here to know more about the plugin.
- EDD Frontend Submissions: This provides the facility to transform your site into a full-fledged, multi-vendor digital marketplace. Click here to know more about the plugin.
Import Demo Content
When you first install Stocky, it won’t contain all the extra content that you might have seen in the live demo. You need to install and activate One Click Demo Import plugin to import the demo content.
Steps
- On WordPress left menu, go to Appearance > Import Demo Data.
- On the One Click Demo Import page. Click on the Import Demo Data button only once and wait, it can take a couple of minutes to import all the demo data.
- Please be patient while importing all the content.
- It will import pages, posts, medias, downloads (products), menus and widgets.

Theme Options Setup
Theme Options is the main section of Stocky, which you can use to change your global settings for your website. You can access Theme Options on WordPress left menu, go to Appearance > Customize > Theme Options.
Basic Settings
- Logo Retina Display: This enables display your logo at half size, making it look crisp on iDevices.
- Upload Logo
- Upload a favicon for the website (Browsers that provide favicon support typically display a page's favicon in the browser's address bar, sometimes in the history as well and next to the page's name in a list of bookmarks).
- Site Layout: Left & Right layouts. Choose the layout to set.
- Credit Where Credit Is Due: Enabling this option will give credit to the Stocky theme and Easy Digital Downloads in the footer.


Home Page Settings
This section has options to setup modules in homepage.

- Header Background: This image is used in all pages as header background.
- Header Text Color: Dark & Light
Important Notice:
- The Home page options, "Call To Action Text", "Call To Action Background", "Max Number of Products to be Displayed on Home Page", "Homepage specific download categories" are all deprecated from this version 2.1
- We used Block (Gutenburg) Editor & shortcodes to build the Home page Design.
- We have moved the 'Home' template of version 1.5.0 to 'Home Old' in version 2.1
- Before using the below options. Click here to know how to setup home-old template to the homepage.
- Call To Action Text: This section appears before the blog section on the home page.
- Call To Action Background: this image is used as background image for Call To Action section. It will be sized to 100% width of the screen
- Max Number of Products to be Displayed on Home Page: Enter Maximum number of products to display on the home page before pagination starts, eg:- 15.
- Homepage specific download categories: This option enables to display only specific categories of downloads on the homepage.
- Note: Leave empty to display all categories.
Store Settings
This section has basic store settings.
- Login Link: This link will be used in the header. You must create a page and put the login form (using the Easy Digital Downloads shortcode [edd_login]) on it. Please use Login Page Template for this page. Put the entire URL in this field including the http:/ or https://.
- Max Number of Products to be Displayed Per Page: This options will display the provided value of products per page, other than the home page, before pagination starts.
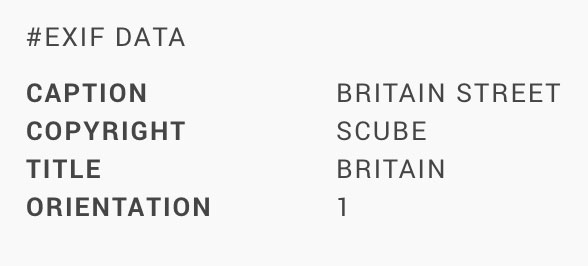
- Display EXIF data: This option shows the EXIF data of the featured image on the product individual page.

Styles Settings
This section has basic style settings of the website.
- Menu Colour Scheme: Dark & Light.
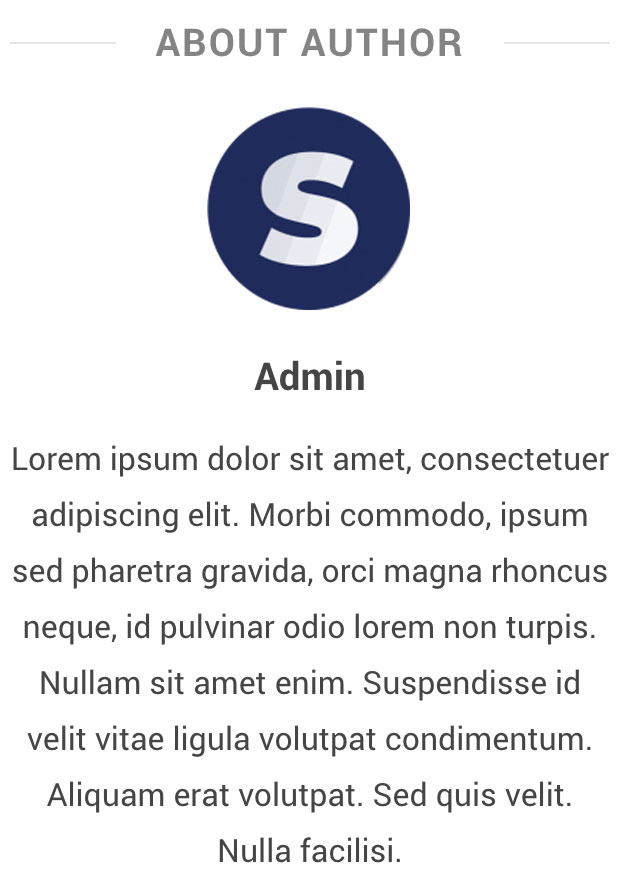
- Post Author Box: if enabled this option, it shows "About This Author" box after post content on post's single page and the description of the author pulls from Users > Your Profile.
- Link Colour: options to set link colour and link hover colour
- Button Colour: options to set button text colour and background colour


Header
Stocky Header consists of 4 items: Logo/Site Title, Menu, Login Link & Cart.
- Logo/Site Title: You can add logo in Appearance > Customize > Theme Options > Basic Settings tab. If the logo is not provided Site Title will be used. Click here for more information.
- Menu: To add header menu, Assign any menu to Main Menu Theme Location. Click here for more information.
- Login Link: To add header login link, Go to Appearance > Customize > Theme Options > Store Settings and add login link. Click here for more information.
- Cart: The cart will appear when Easy Digital Downloads plugin is installed and activated.
Menu
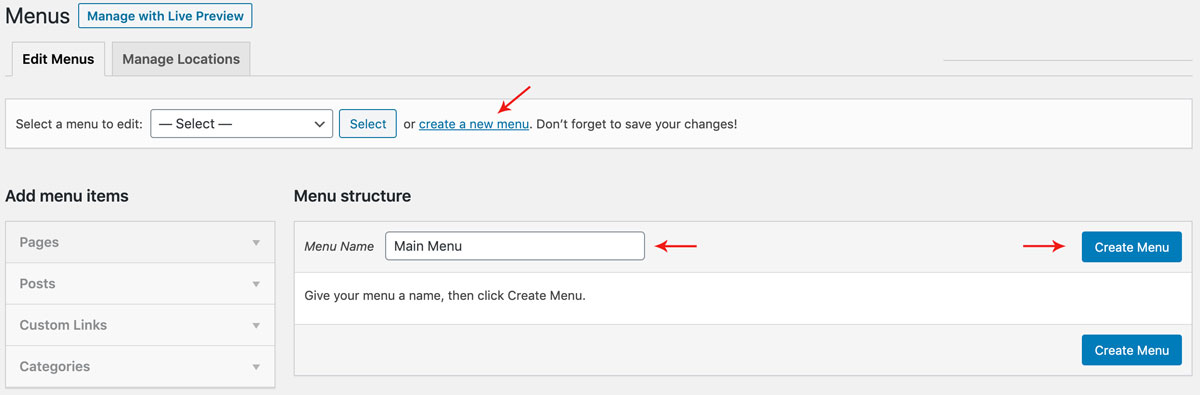
How to Create Menu
- To create Menu, On WordPress left menu, go to Appearance > Menus and click on 'create a new menu' link.
- Enter the Menu name.
- Add pages, posts, etc from Add Menu Items.
- Finally, Click the Create Menu button to save your changes.
Menu Features
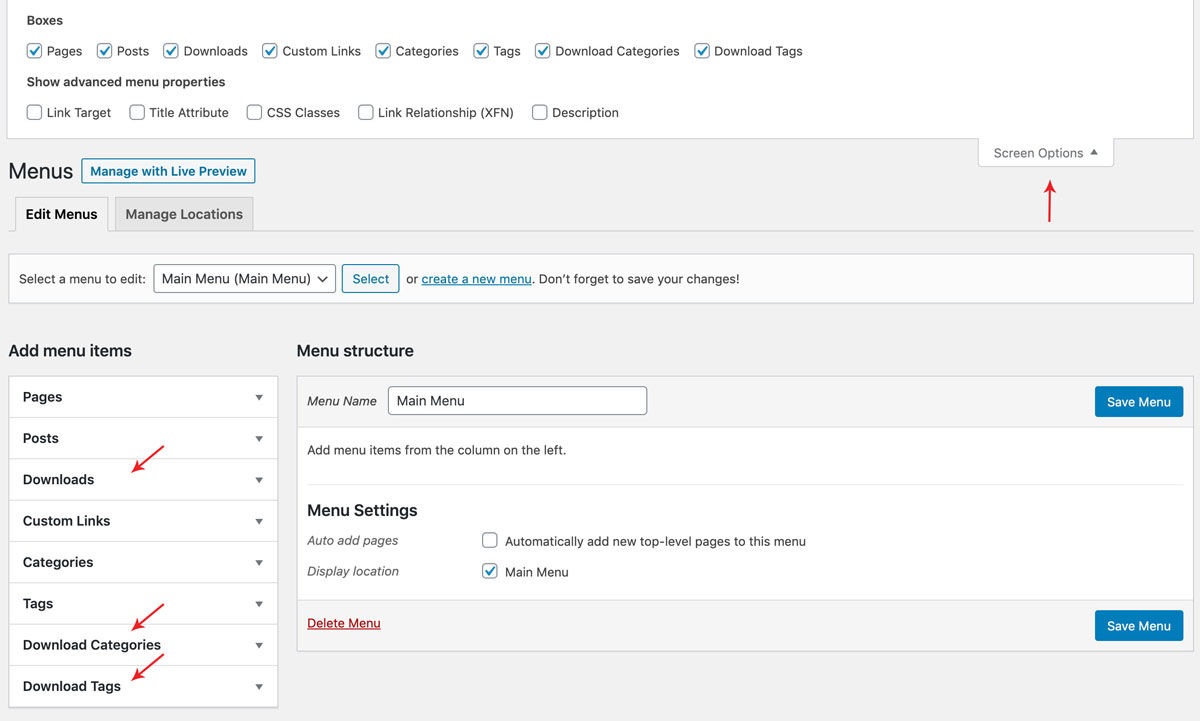
- Default Wordpress has 'Pages, Posts, Custom Links, Categories, Tags' Menu items.
- Easy Digital Downloads Menu Items: Downloads, Download Categories & Download Tags
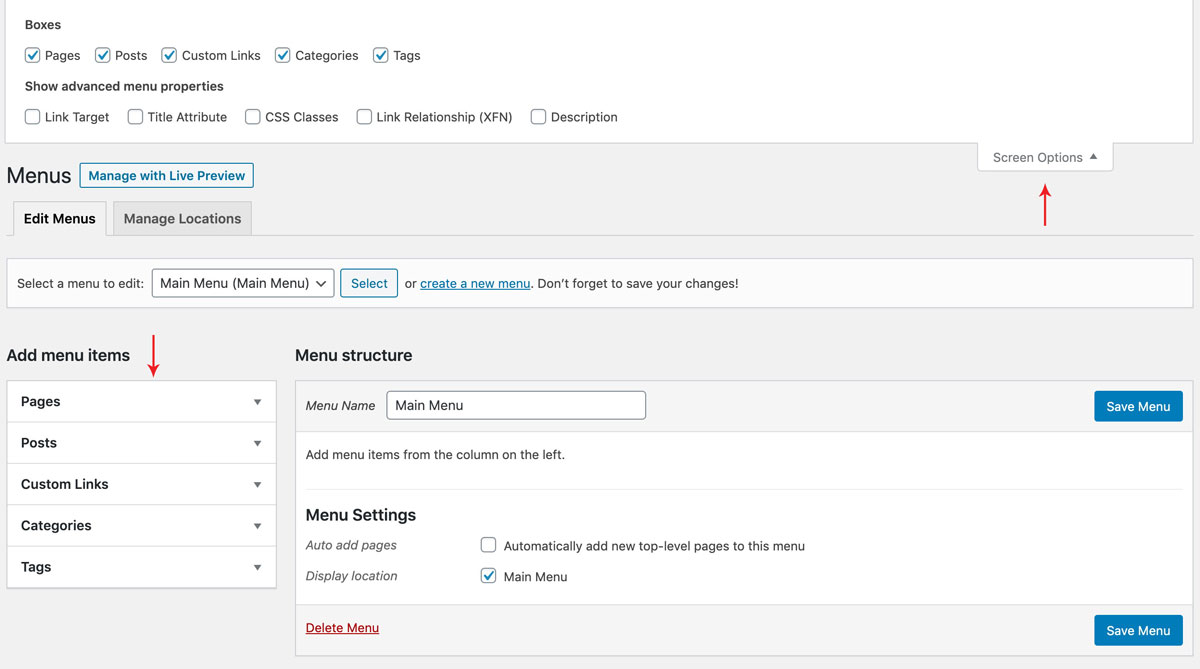
Header Menu
- The Header Menu is placed adjacent to the logo on the header.
- Setup Header Menu: On WordPress left menu, go to Appearance > Menus
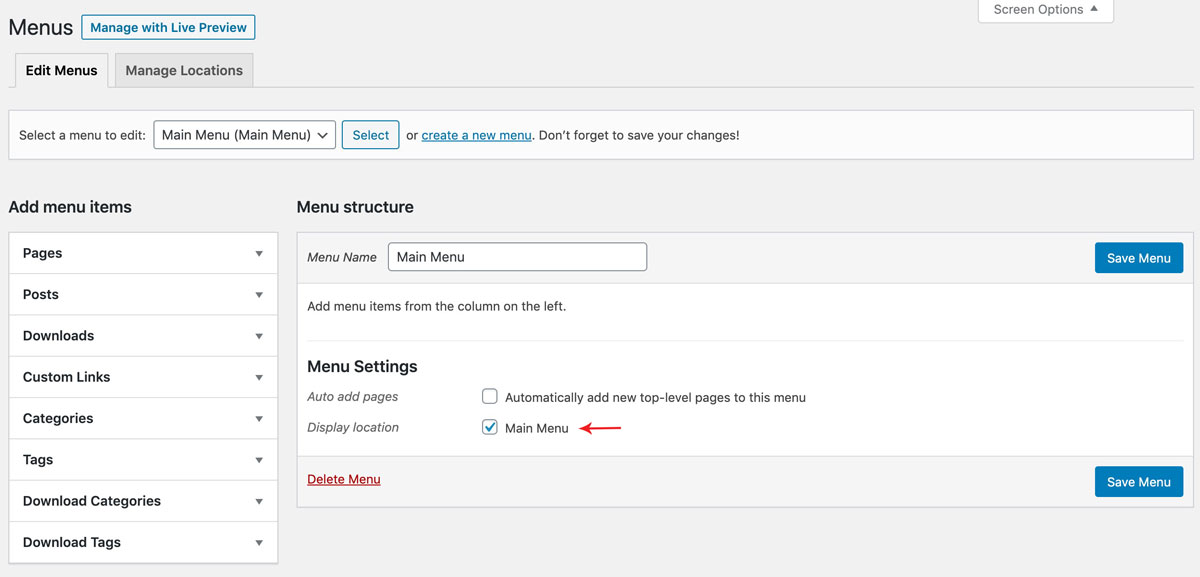
- You can create a menu or if you downloaded the demo content, It has the menu named 'Main Menu'. Select the menu. On the Edit Menus tab, below the Menu Structure. It has Menu Settings, Tick the checkbox 'Main Menu'. Finally save the changes.
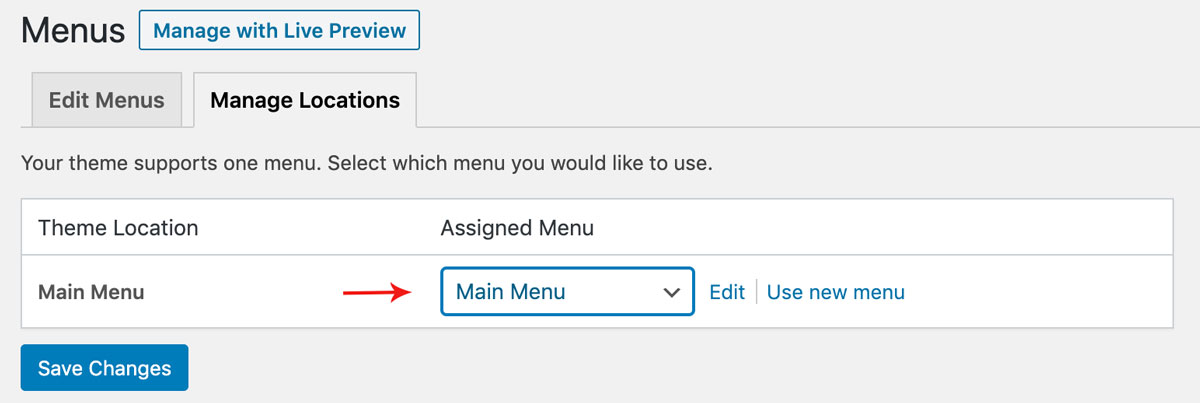
- Alternatively, on Manage Locations tab, Assign the Menu to Main Menu Theme Location.
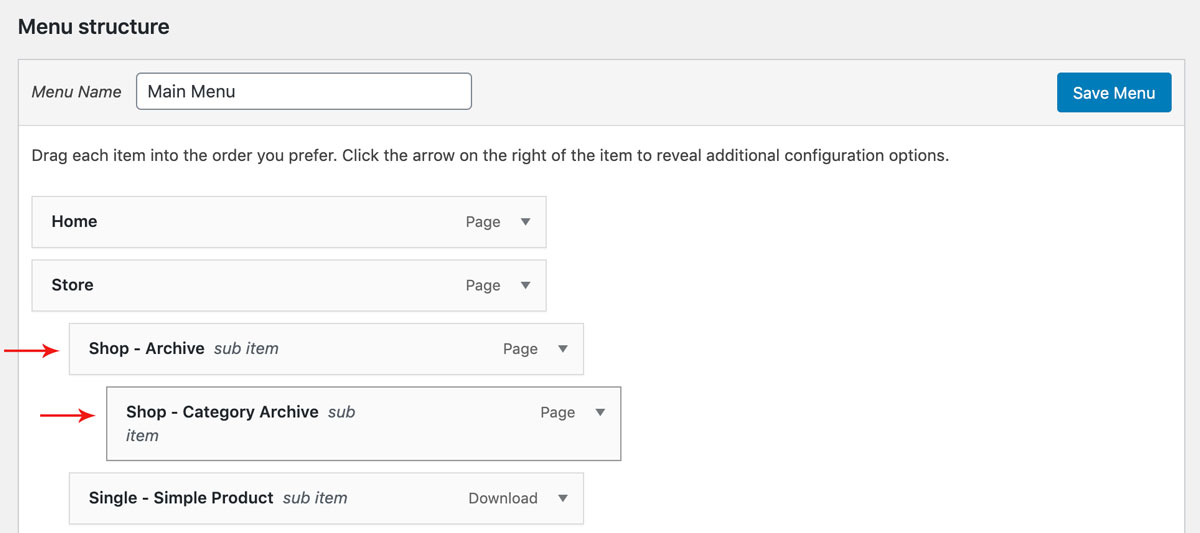
- Header menu supports 2-level sub menus.
- On Menu Structure, Drag a menu item towards right under another menu item to make it as sub item.

Footer
Stocky Footer consists of 3 items: Footer Widgets, Social Networks and Copyright & Credit.
Copyright & Credit Section
- Copyright year is automated. It will change every year.
- Site Title is used after the copyright year.
- Credit text will appear only when the option 'Credit Where Credit Is Due' on Basic Settings of the Theme Options (Appearance > Customize > Theme Options > Basic Settings tab) is enabled. Default Site Tagline will appear.

Widgets
How to Add Widgets
- On WordPress left menu, go to Appearance > Widgets. You can see available widgets on the left and widget areas on the right.
- Choose a Widget and either drag it to the sidebar where you wish it to appear, or click the widget, (select a destination sidebar) and click the Add Widget button.
Available Widgets
- Wordpress has lots of widgets available to add in widget areas. Click here to know more about wordpress widgets.
- Easy Digital Downloads plugin has few widgets available to use.
- Cart Widget: This will display the downloads shopping cart. Click here for more information.
- Download Details Widget: This will display the details of a specific Download. Click here for more information.
- Downloads Categories / Tags: This will display the downloads categories or tags.
- Stocky provides 2 custom widgets to use.
- Featured User Widget: This will display a specified user's gravatar, display name, bio, and link to their author post archive. Go ahead and put in a title, select the featured user from the drop down list, and click on the Save button.
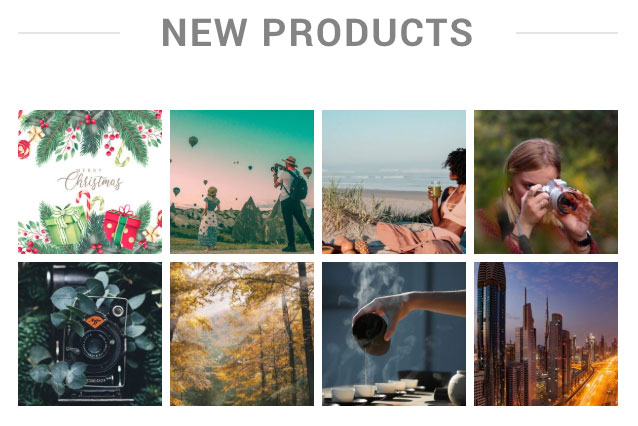
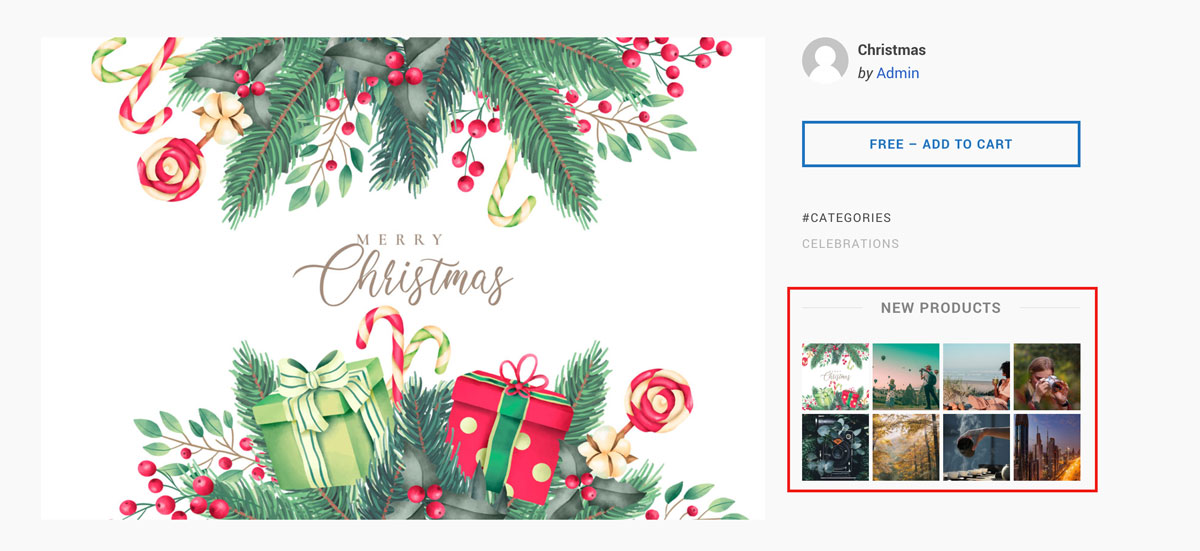
- New Products Widget: This will display a specified number of new product featured images along with a link to their page. Go ahead and put in a title and the number of posts you wish to list (it displays 4 images in a row), and click on the Save button.
Widget Areas
Stocky provides 3 widget areas: Home, Footer and Sidebar.

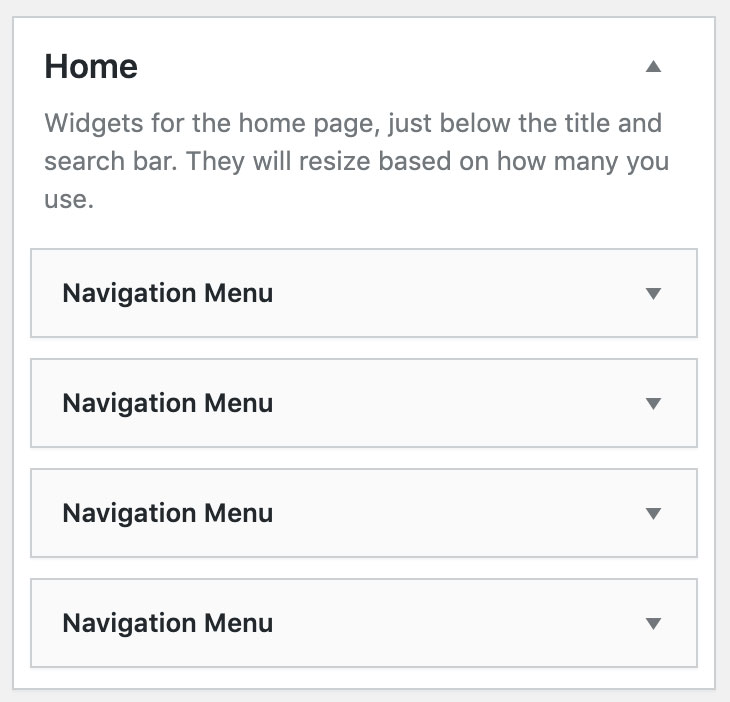
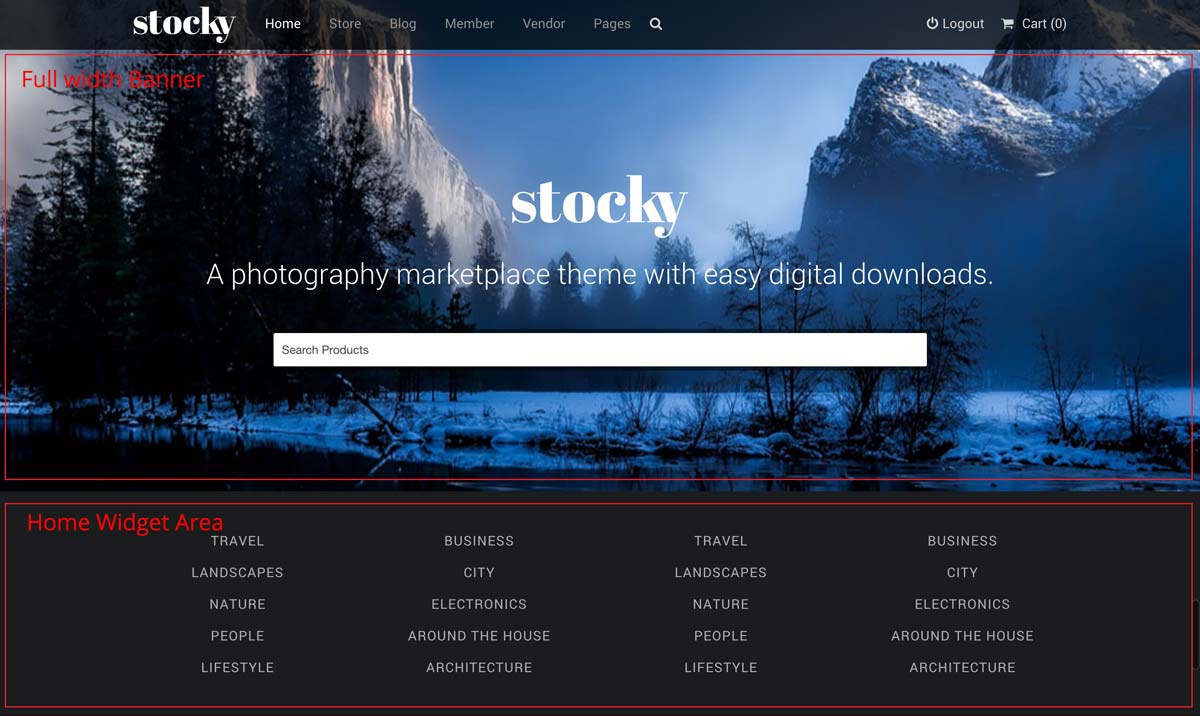
Home Widget Area
- Stocky provides Home Widget Area on the home page next to the header. The home page of this theme, just below the header. The layout will resize based on the number of widgets used.
- Feel free to use what you want, and as many as you want. The demo website displays categories in this area using four instances of the navigation menu widget.

Sidebar Widget Area
- Widgets which are added in this Widget Area will be visible on Blog Archive page (also includes category, tag & author archives), Blog Single page, Pages with 'Default Page' Template.
- Feel free to use what you want, and as many as you want. The demo website displays some of the available widgets in this area.


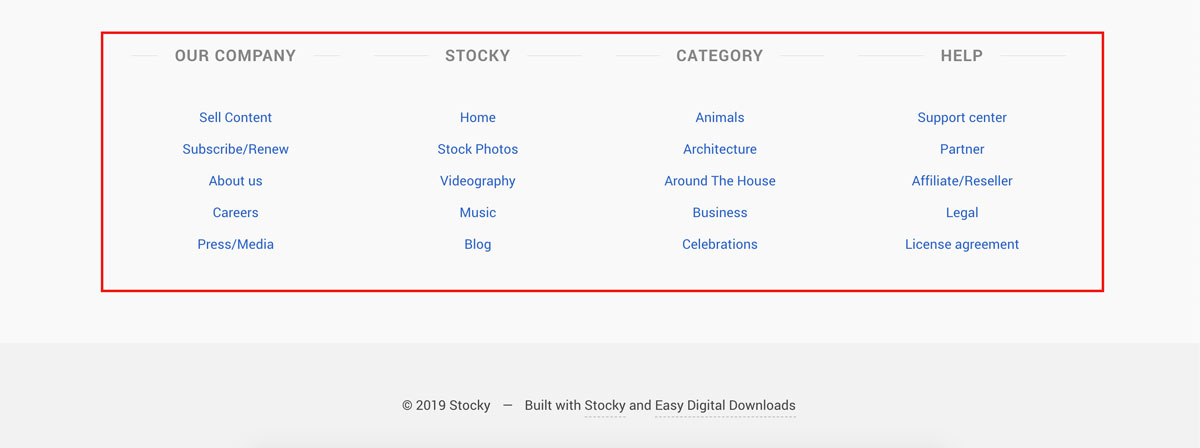
Footer Widget Area
- Widgets added in this widget area will be visible on footer section.
- Every widget will be displayed in a column. The column layout will resize based on the number of widgets used.
- Feel free to use what you want, and as many as you want. But for better look, we suggest not to add more than 4 widgets in this widget area. The demo website displays four-column layout in this area using four instances of the navigation menu widget.

EDD Widget Areas
Easy Digital Downloads Plugin provides two widget areas.
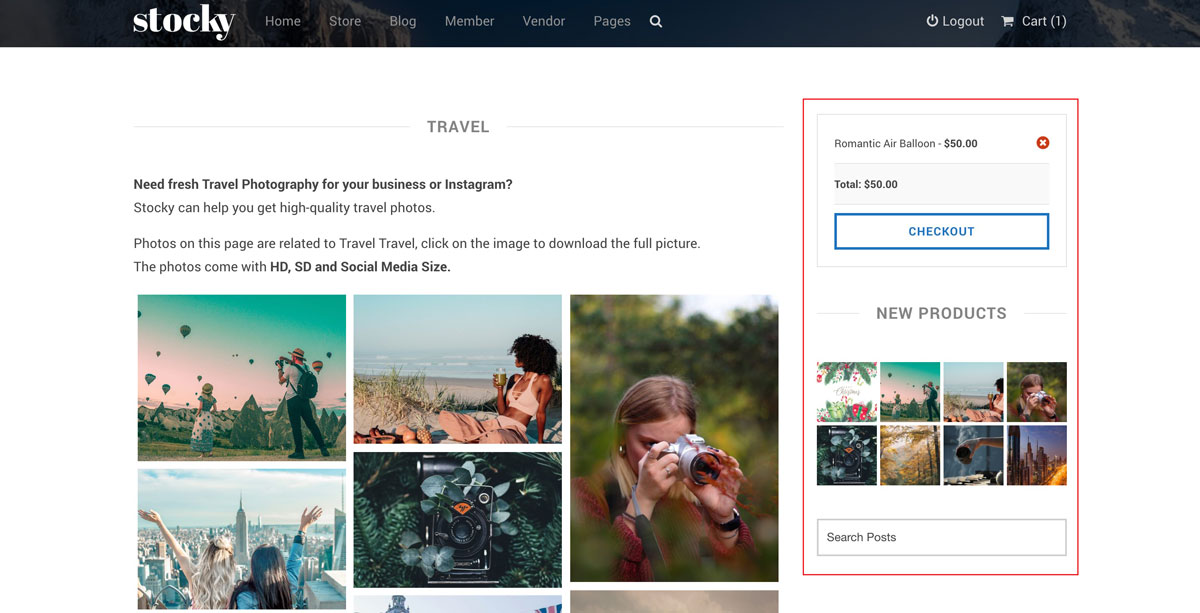
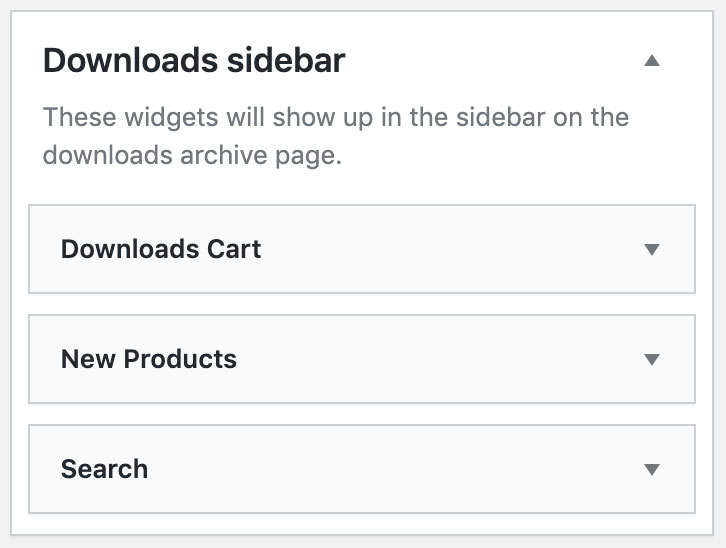
Downloads Sidebar Widget Area
- Widgets added in this widget area will be visible on downloads archive page, downloads category & downloads tags pages.
- Feel free to use what you want, and as many as you want. The demo website displays 3 widgets (cart, new products, search) in this area.
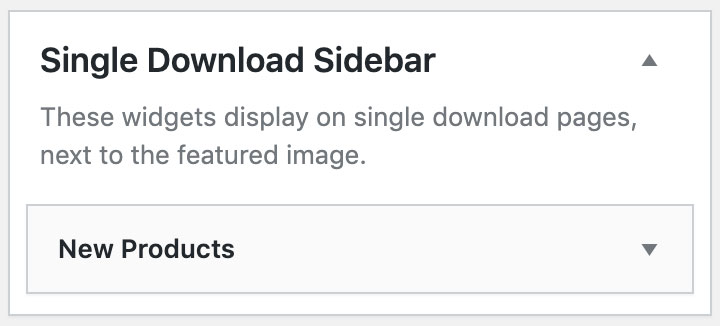
Single Download Sidebar Widget Area
- Widgets added in this widget area will be visible on Downloads single (product) page below the product informations.
- Feel free to use what you want, and as many as you want. The demo website displays 1 widget (new products) in this area.
Pages
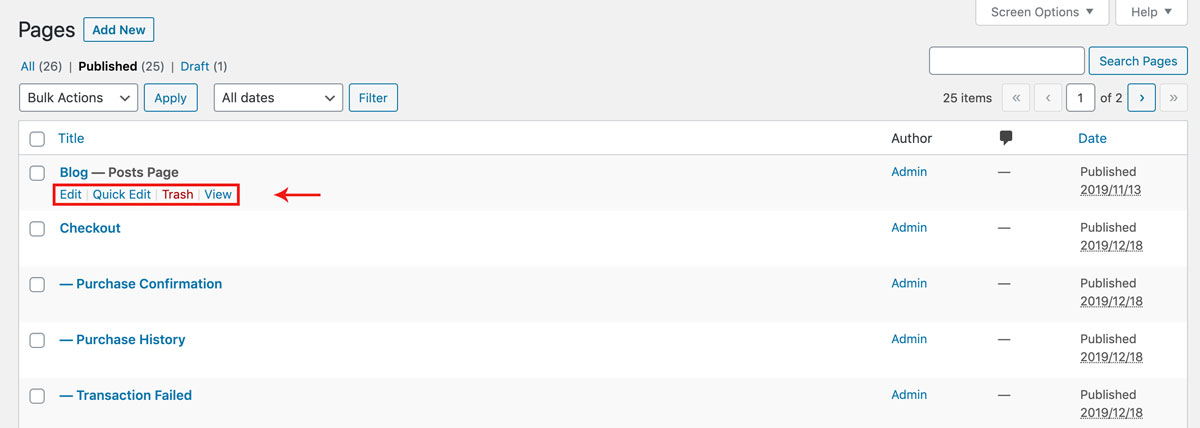
- To view/access all available pages on the website, on WordPress left menu, go to Pages. It will list all the availble pages.
- If you downloaded the demo content, You can see demo pages.
- When hover on the available page on the list, You can see the options for each page.
How to Create a Page
- To create a page, on WordPress left menu, go to Pages > Add New.
- Stocky supports Block (Gutenburg) Editor. Click here to see how to add content using Block (Gutenburg) Editor.
- Add Page title, content, choose 'page template' (if required), choose 'parent page' (if requried) and publish it.

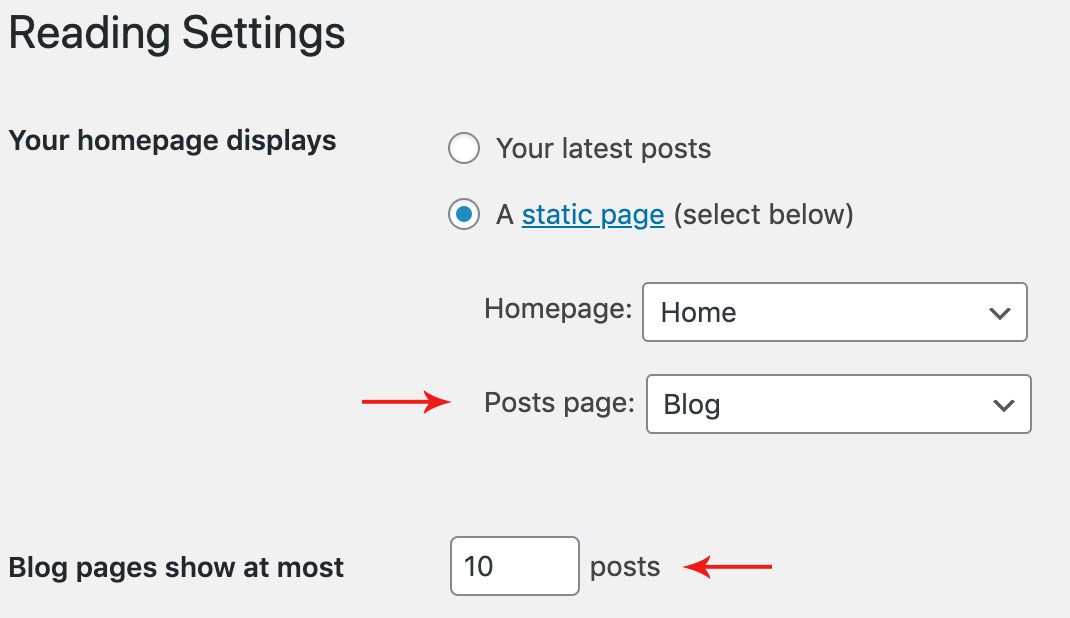
How to setup Homepage
- To setup homepage, Create a page, name it, choose 'Home' page template and publish the page. Click here to know how to create a page.
- Then on WordPress left menu, go to Settings > Reading.
- On Reading Settings page, Choose 'A static page' option and select the page from the list to set as home page.
Page Templates
Stocky provides 7 page templates. They are Home, Home Old, Default, Full Width, Login & Register, Contact and Vendor Portfolio Templates.
How to setup Page Template
- While creating a page, you can choose the page template or you can change the page template anytime while editing the page.
- It is important to choose correct page template for each page.
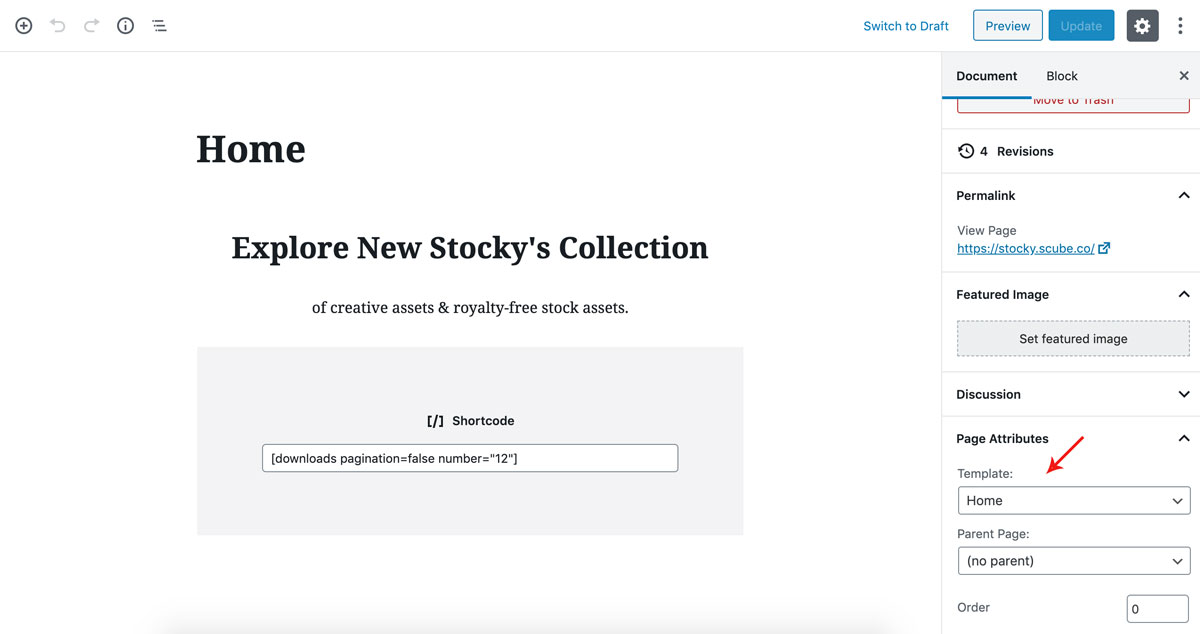
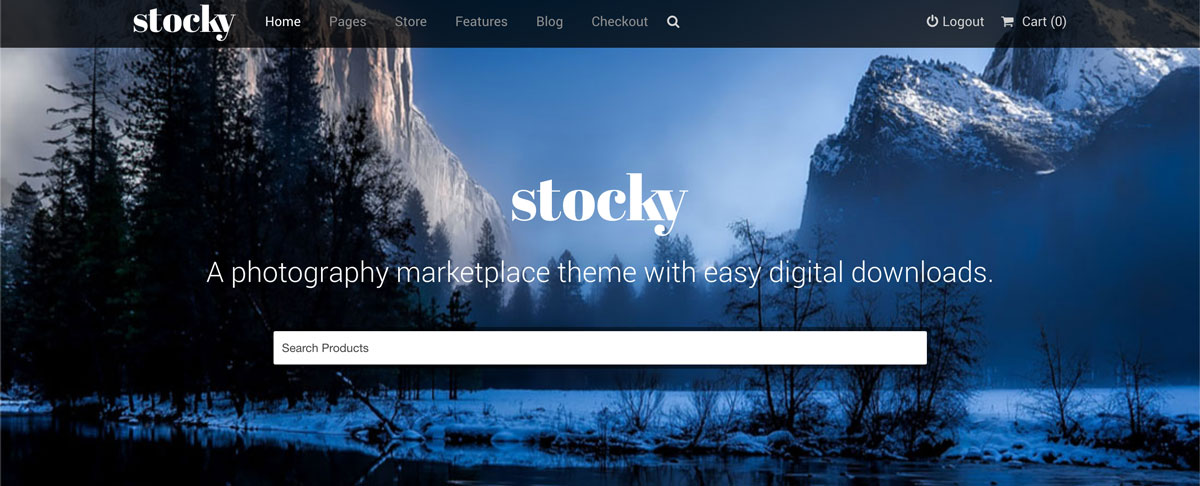
Home Page Template
- Home Page Template is mainly designed for page which is assigned as Homepage. Click here to know how to setup a homepage.
- It has Fullwidth Banner (includes Site Logo, Site Tagline & Search form) and Home Widget. Click here to know more about Home Widget Area.
- The content of the page will appear below the Home widget.
- Home template of current version (1.6.0) is completely Block (Gutenburg) Editor compatible. Feel free to use what you want to build the page.
Home Old Page Template
Important Notice:
- 'Home' page template of version 1.5.0 is moved to 'Home Old' in version 2.1
- Home Old template is only a backup to quickfix the home page for the current version 2.1
- This template will be removed on the future versions.
- Home Old Page Template is mainly designed for page which is assigned as Homepage in version 1.5.0. Click here to know how to setup a homepage.
- It has Fullwidth Banner (includes Site Logo, Site Tagline & Search form), Home Widget, Products grid layout, Call To Action section, Latest posts.
- The modules of this template is very limited. You can't add more modules to the home page. Click here to setup the options in Home Page Settings.
Default Page Template
- This is the default template for pages & posts.
- This template has sidebar (Left or Right). You can setup the sidebar using Site Layout option on Appearance > Customize > Theme Options > Basic Settings. Click here to know more about it.
Full Width Page Template
- This template has no sidebar. The content of the page is streched to the full width of the page container.

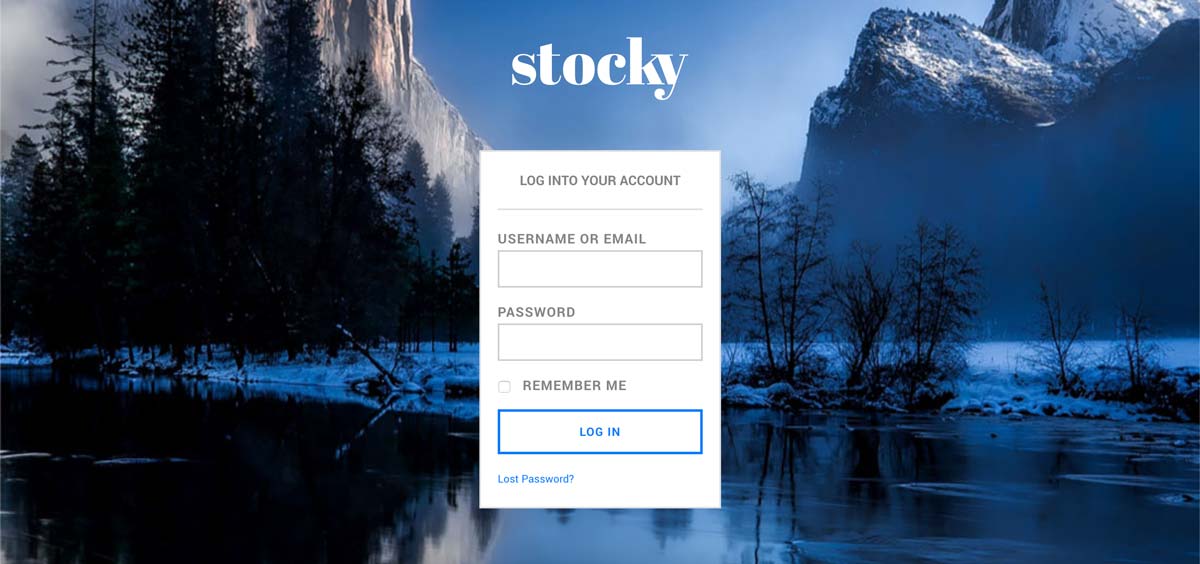
Login & Register Page Template
- This template is designed for login and register page.
- This template has login/register form with fullwidth background image.
- The background image is from the option Header Background on Appearance > Customize > Theme Options > Home Page Settings.
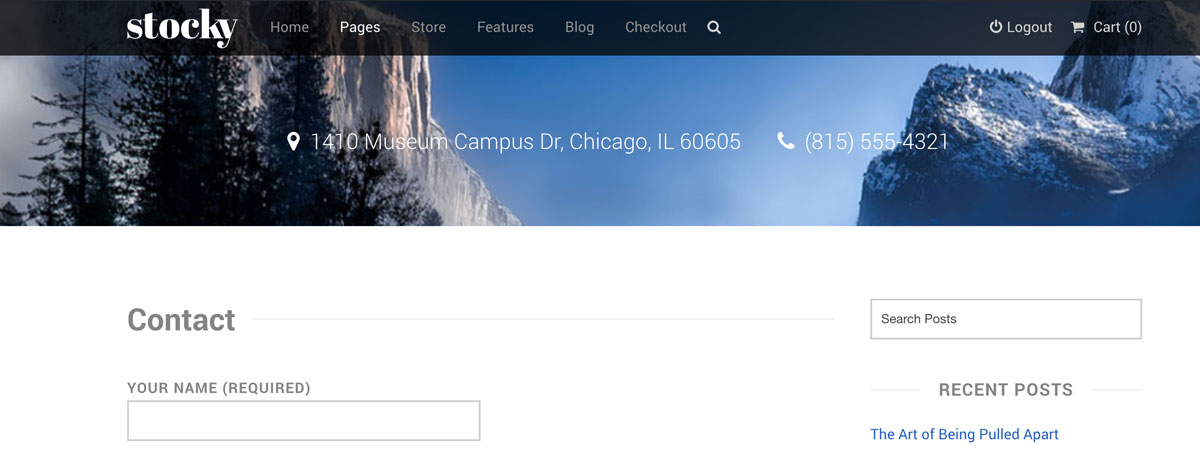
Contact Page Template
- This template is designed for contact page.
- This template has Physical Address and Phone Number on the header.
- To setup the Physical Address and Phone Number information, go to Appearance > Customize > Theme Options > Contact Information. Click here to know more about it.
Vendor Portfolio Page Template
- This template can be used when the plugin Easy Digital Downloads - Frontend Submissions is installed and activated.
- This template has list of vendor's product in a grid layout and on the sidebar it has vendor information and contact form for the vendor.
Blogs
Blog Archive
How to setup Blog Archive page
- To setup blog archive page, Create a page, name it and publish the page. Click here to know how to create a page.
- Then on WordPress left menu, go to Settings > Reading.
- On Reading Settings page, From Posts page dropdown, select the created page.
- Then on 'Blog pages show at most' field, enter the number of posts to show on the page before pagination.
- Finally, Click on the Save Changes button.
- Now you can see the page, It will show the blog archives.
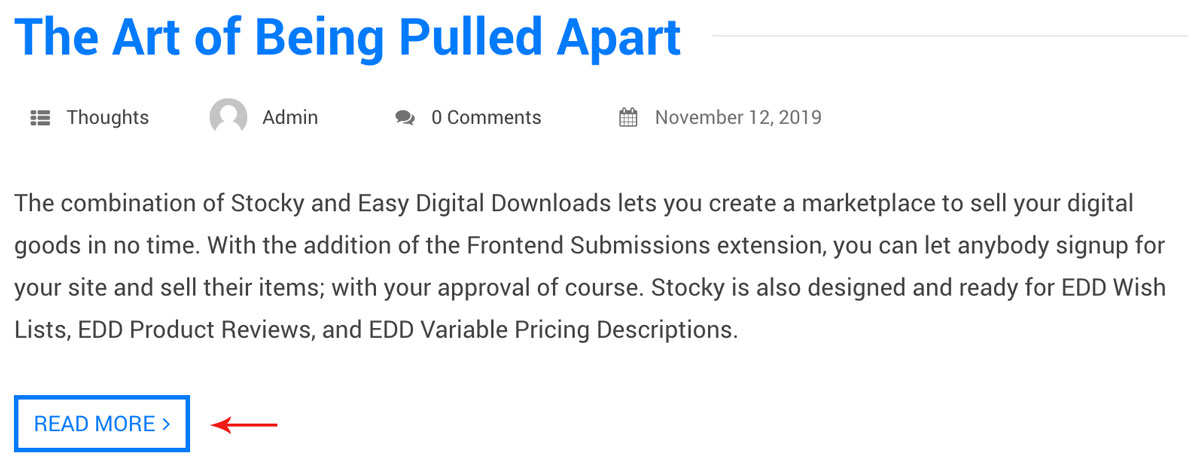
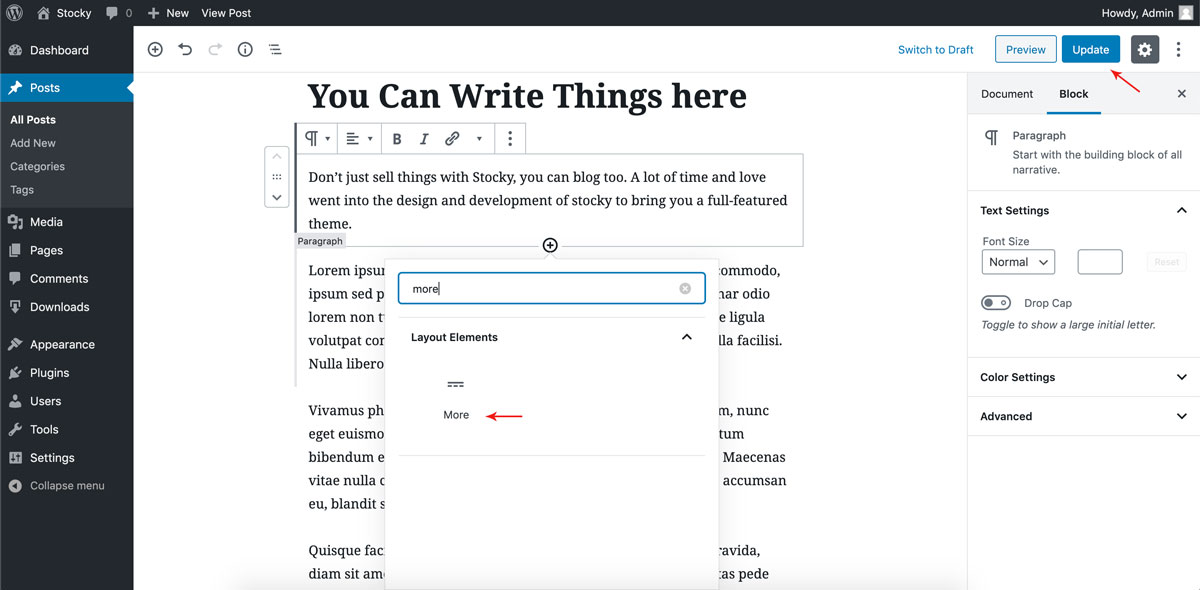
How to add Read more Button
- Default, Blog Archive page shows all the content of the blog. If you need to create Read more button link
- Go to Blog Edit page. Using Block Editor (Gutenburg), you can add more block element. Finally, Update the post. Click here to know how to create a blog.
- The content above the more block element will appear on the archive page.
- Now the Read more button will be added to the archive page.
Blog Single
- To view/access all available post on the website, on WordPress left menu, go to Posts. It will list all the availble posts.
- If you downloaded the demo content, You can see three blogs on the backend posts page.
- When hover on the available blog (post), You can see the options for each blog.

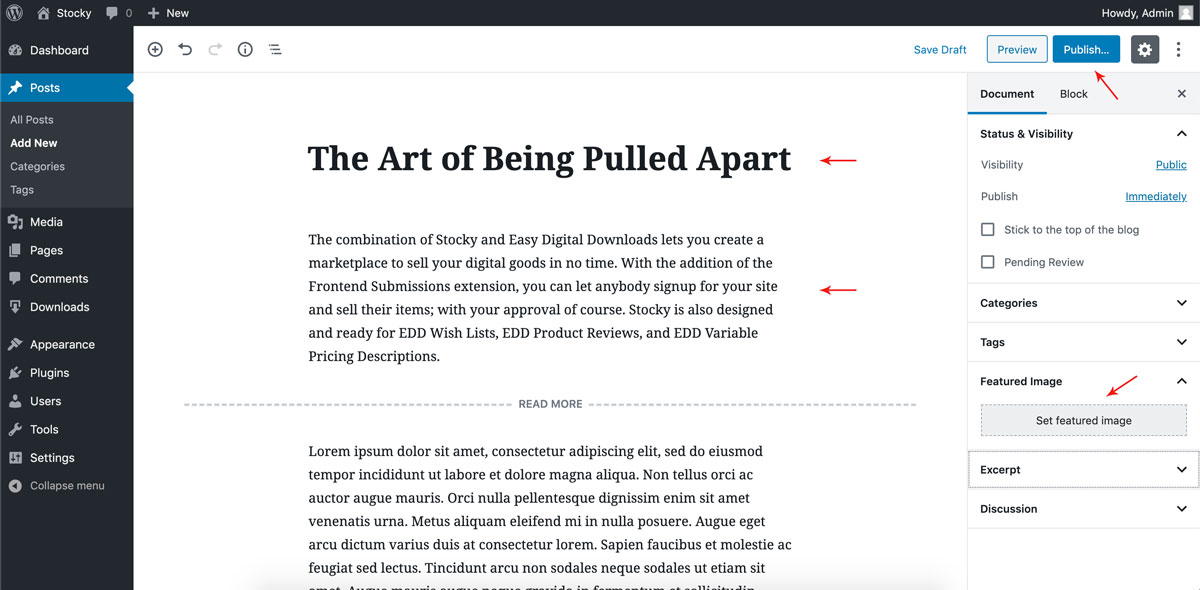
How to Create a Blog
- To create a blog, on WordPress left menu, go to Posts > Add New.
- Stocky supports Block (Gutenburg) Editor. Click here to see how to add content using Block (Gutenburg) Editor.
- Add Blog title, content, featured image and publish it.
Blog Shortcode
- We have created a shortcode [scube-latest-posts] to display the latest posts on the page.
- You can add anywhere on the page. The demo website displays the latest posts on the home page using this shortcode.
- To add this shortcode, On Add New Page/Edit Page, using Block (Gutenburg) Editor, click on the 'plus icon' to add new block, search for 'shortcode' block and add it. In shortcode block add the [scube-latest-posts] shortcode in it.
- Click on preview to see the latest posts and finally update the changes.


Downloads (Products)
- Easy Digital Downloads plugin provides detailed documentaion. Click here to know more about the plugin.
- EDD Settings and Configuration: Click here to know more about initial setup of the store.
- EDD Create Product: Click here to know more about how to create a product with Single or Variable pricing.
Downloads (Products) Archive Page
- By default, the Downloads (Products) Archive Page will be https://your-website.com/downloads/
- By using shortcode [downloads],You can make any page into Downloads (Products) Archive Page.
- In demo, We have created a page named 'Store' and placed the shortcode on it. Click here to know more about the downloads shortcode.
- For Category (or Tag) Archive page, the default link will be
- https://your-website.com/downloads/category/category_name/
- https://your-website.com/downloads/tag/tag_name/
- By using shortcode [downloads category="7,15"] or [downloads tags="12,18"] like this, You can make any page into Downloads (Products) Category/Tag Archive Page.
- In demo, We have created a page named 'Travel Photographs' and placed the shortcode on it. Click here to know more about the downloads shortcode with categories and tags.
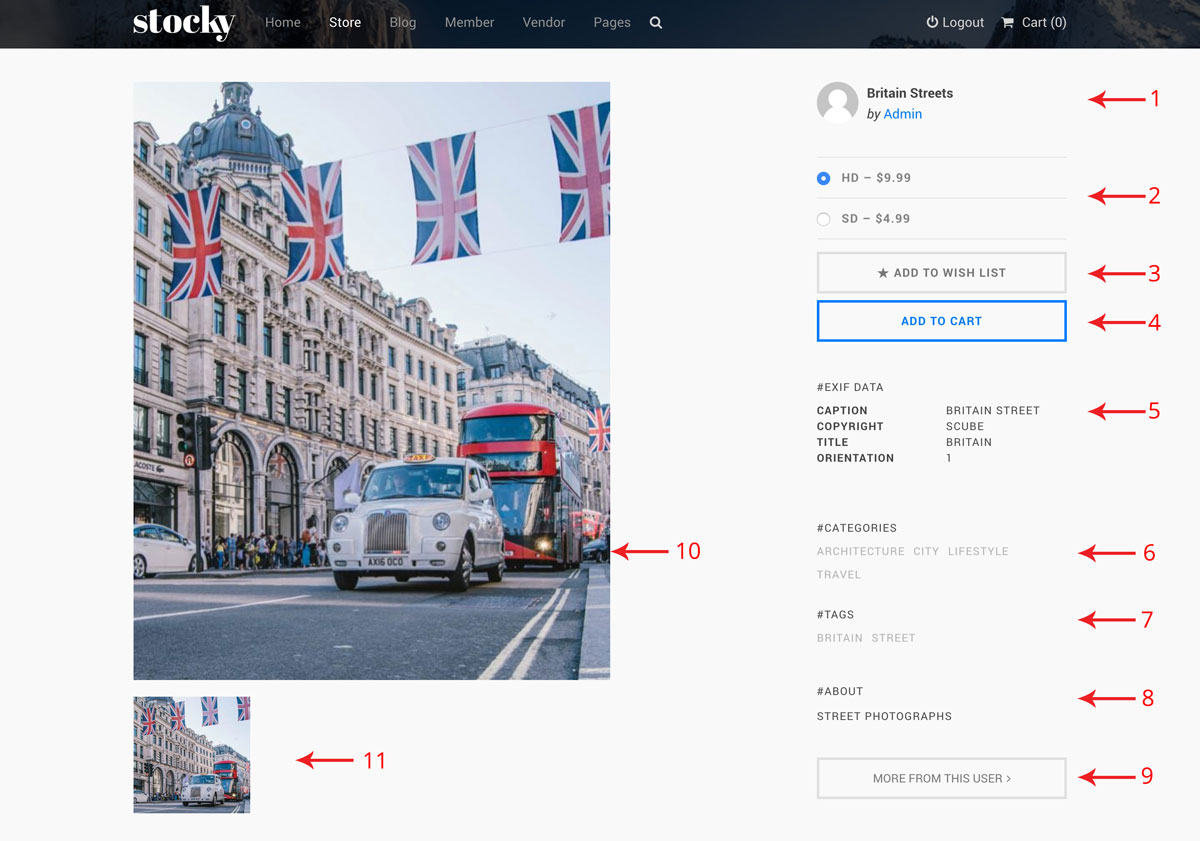
Downloads (Products) Single Page
- Downloads (Products) Single page layout is breakdown to 2 sections,
- Product Info & Image section
- Product Reviews & Comments section
- Product Info & Image section
- Product name, Author name with author gravatar.
- Product variations and price
- Add to wishlist button. (Note: It will show up, when Easy Digital Downloads - Wish Lists plugin is installed and activated.)
- Add to cart button
- Rating block: It shows the average rating (5 star-ratings) of the product. (Note: It will show up, when Easy Digital Downloads - Reviews plugin is installed and activated.)
- #EXIF DATA: It shows the metadata of the featured image.
- #CATEGORIES: List the Categories of the product.
- #TAGS: List the tags of the product.
- #ABOUT: It shows Excerpt information of the product.
- MORE FROM THIS USER button: It links to the products archive page of the product author.
- Download Image: Displays full image of the download Image.
- Image Gallery: If product has multiple images, It will display here. Click on the image to view the popup image slider.
- Product Detailed Description: This area shows the detailed content of the product and it is placed above the Product Reviews & Comments section.
- Product Reviews & Comments section
- Customer Reviews: It shows the list of product reviews submitted by the purchasers.
- Comments: This is the default wordpress option for posts. It will show the list of comments on the products.
Changelog
Version 2.1 (November 2022)
- New Feature:
- Support for latest wordpress Version.
- Fixed grid bug for homepage.
- Theme tested with latest version of easy digital downloads plugins.
Version 2.0.0 (September 2020)
- New Feature:
- Theme options will not work from this update.
- Theme options are converted to customizer options.
- Old theme options can still be migrated to theme options via migrate button on Appearance > Customize > Theme options > Options Migration.
- One click demo import will now import theme customizer options too.
- Bug fix:
- Requried plugin installation warning message bug has been fixed.
Version 1.6.3 (July 2020)
- New Feature:
- One click demo import functionality added.
- Many bugs fixed.
Version 1.6.0 (6 January 2020)
- New Feature:
- Mobile: Main menu: Responsive menu is added.
- Shortcode: [scube-latest-posts] to add latest posts in full-width 3 column layout.
- Improvement:
- Gutenburg compatibility.
- Home page: New enhanced design options and it is built using Gutenburg.
- Home page: Logo is added in header.
- Main menu: Aligned in the same row of the logo.
- Login & Register Template: Back to home link added.
- Removed:
- Mobile: Main menu: Select Dropdown menu.
- Theme Options: Home Page: Call To Action section and Product display options are deprecated from this version.
Version 1.5.0 (25 June 2018)
- Improvement:
- Added updated, supported meta box library.
- Added meta box to build galleries on download posts.
- Bug Fix:
- Removed outdated meta box library.
- Removed random sort order option for download shortcode.
- Fixed bug thrown by Options Framework plugin.
- Maintenance: cleaned up and updated CSS related to FES & Vendor Dashboard
Version 1.4.0 (29 July 2016)
- Improvement:
- Added additional social network options for footer.
- Bug Fix:
- Updates to maintain compatibility with latest release of EDD Reviews (2.0).
Version 1.4.1 (4 January 2017)
- Improvement:
- Added random sort option for homepage image grid.
- Bug Fix:
- Added a fix for tables on Vendor Dashboard at the mobile breakpoint.
- Added CSS to fix background height issue on login page.
- Maintenance: Updated some deprecated PHP functions
Version 1.4.2 (1 September 2017)
- Improvement:
- Updating text-domains to stocky.
- Bug Fix:
- Content-css issue.
- Cleaning up deprecated function on single-download.
Version 1.4.3 (27 September 2017)
- Improvement:
- Bundled Font Awesome and removed call to CDN.
- Bug Fix:
- Removed check for content on single-download (prevented reviews from displaying if no content).
- Updated CSS for reviews.
Version 1.4.4 (24 October 2017)
- Improvement:
- Updated function for additional featured images/gallery thumbnails.
Version 1.3.0 (27 May 2015)
- Improvement:
- Added option to display a different number of items on the homepage vs everywhere else
- The Excerpt can now be displayed in the Download Sidebar.
- Download Sidebar is now Widgetized.
- Bug Fix:
- Cleaned CSS on child categories on menu widgets.
- Cleaned CSS on Gravity Forms in Widgets.
- Fixed an issue where the Featured User Widget was linking to the wrong user.
Version 1.3.1 (25 August 2015)
- Bug Fix:
- Updated deprecated code for WP 4.3.
Version 1.3.2 (9 September 2015)
- Bug Fix:
- Fixed an issue where widgets on download archives were displaying the wrong number of posts.
Version 1.3.3 (30 September 2015)
- Bug Fix:
- Fixed download images showing in product gallery.
- Fixed related products showing too many products.
- Updated wp_title.
- Updated widget_init.
Version 1.3.4 (19 November 2015)
- Bug Fix:
- Added wraps to custom functions.
- Updated code for Vendor Contact Form.
- Updated deprecated tags.
- Added CSS and fixes for EDD, Wishlists, and FES.
Version 1.3.5 (19 November 2015)
- Bug Fix:
- Slight tweak to FES fieldset CSS.
Version 1.3.6 (27 November 2015)
- Bug Fix:
- Fixed an error with FES author links.
- Fixed the display of Vendor contact forms in Internet Explorer.
Version 1.3.7 (18 January 2016)
- Bug Fix:
- Cleaned up some styles for FES: vendor dashboard, login/register forms.
Version 1.3.8 (2 Febraury 2016)
- Improvement:
- Updated function for custom header in FES Vendor Dashboard.
Version 1.2.0 (2 Febraury 2015)
- New Feature:
- Added custom header images to Vendor Pages.
- Added an optional sidebar to Download Archives.
- Theme Options: Home Page: Added option for specific categories to be displayed on the home page.
- Improvement:
- Main menu: Added option to keep menu visible at all times.
- Main menu: Added Option for light menu color scheme.
- EXIF data is now (optionally) extracted and displayed on download pages.
- Added EDD Commissions icon to FES Dashboard.
- More support for videos in FES. **See help file for more info.
- Removed Wish Lists file and added more CSS support for the EDD Wish List plugin.
- Added support for Relavanssi plugin search results.
- Widget: Featured User widget now links to the User's Portfolio.
- Footer: Added LinkedIn to Social Network Icons.
- Bug Fix:
- Header: Fixed an issue with header images on iPads.
Version 1.2.1 (4 Febraury 2015)
- Improvement:
- FES backwards compatibility.
Version 1.2.2 (9 Febraury 2015)
- Bug Fix:
- Fix for EXIF data display.
Version 1.2.3 (13 Febraury 2015)
- Bug Fix:
- CSS updates.
- Fixed an error with Google Fonts when using an SSL.
Version 1.2.4 (4 March 2015)
- Bug Fix:
- Fixed a PHP short tag issue.
Version 1.1.0 (31 July 2014)
- Improvement:
- Full size image is now never shown on the site, Video support, minor php and css tweaks.
Version 1.0.0 (8 July 2014)
- Initial release
Version 1.0.1 (14 July 2014)
- Improvement:
- Various CSS fixes
Version 1.0.2 (15 July 2014)
- Improvement:
- Fix for users not being able to scroll due to a plugin conflict, a few minor css and php tweaks.
Version 1.0.3 (17 July 2014)
- Improvement:
- CSS updates.
Stocky - A Photography Marketplace Theme

Built on WordPress and Easy Digital Downloads, Stocky allows you to sell your photos just the same as any giant online marketplace. Not only can you sell your products, but with the available extensions in an EDD Pass you can allow anybody to upload their photos and sell through your site.
Thank you for purchasing the theme. We provide support for all of our themes at https://www.scube.co/support/, but please make sure you read this documentaion in it's entirety first. For support on the Easy Digital Downloads plugin please visit https://easydigitaldownloads.com/support/.
Thanks again!
Social Networks
The information in this section will be displayed on the Footer.