Stocky Jekyll Theme Documentation
- Created On: 09/01/2020
- Last Changed: 09/01/2020
- Current Version: 1.0.0
- Developed By: Scube Themes
- Theme Support: http://go.scube.co/stocky-js
Introduction
Stocky is a Jekyll photography marketplace theme, that provides you with pages required to setup a digital marketplace.
Thank you for purchasing the theme. We provide support for all of our themes at http://go.scube.co/stocky-js, but please make sure you read this documentation in it's entirety first. Thanks again!
Theme Installation
Installing The Theme
- Copy the theme files to your website directory.
- To run the theme locally, navigate to the theme directory in your terminal
- Run bundle install to install the theme's dependencies.
- Then run jekyll serve to start the Jekyll server.
- If any error occurs click here to troubleshoot.
Plugins
Installed Plugins
- Jekyll Feed plugin: This plugin is used to generate an Atom (RSS-like) feed of your Jekyll posts. Click here to know about the plugin.
- Jekyll SEO Tag: This plugin add metadata tags for search engines and social networks to better index and display your site's content. Click here to know about the plugin.
- Jekyll Paginate V2: This plugin is used for pagination. Pagination generates paginated pages for all your tags, categories and collections. Click here to know about the plugin.
- Jekyll Archives: This plugin is used to generate post archives by tags and categories. Click here to know about the plugin.
Configuration Options Setup
Manage the configuration setup in _config.yml file.

Logo & Favicon Settings
This section has options to setup Logo & Favicon.
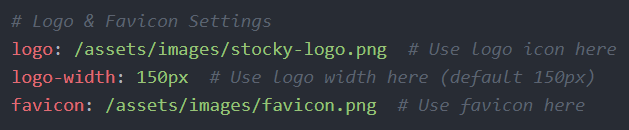
- logo: Use logo to displays in the header section.
- logo-width: Add the width for the logo.
- favicon: Upload a favicon for the website.
Footer Columns Settings
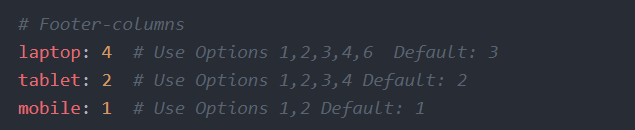
- laptop: Number of columns for laptop devices can be used here.
- tablet: Number of columns for tablet devices can be used here.
- mobile: Number of columns for mobile devices can be used here.
Pagination Settings
This section has basic setting for the pagination.
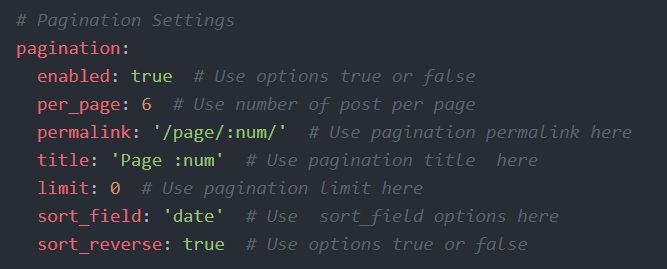
- enabled: Site-wide kill switch, disabled here it doesn't run at all.
- per_page: How many objects per paginated page.
- permalink: The permalink structure for the paginated pages.
- title: Optional the title format for the paginated pages.
- limit: How many paginated pages to create.
- sort_field: Optional, defines the field that the posts should be sorted on.
- sort_reverse: Optional, sorts the posts in reverse order.
Archive Settings
This section has basic setting for the Archive.
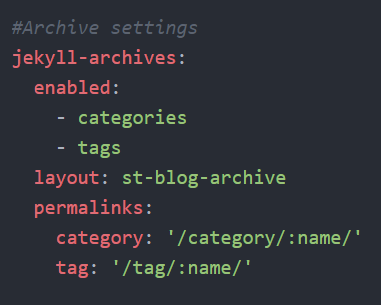
- enabled: This option sets which types of archives will be created.
- layout: Sets the default layout to use.
- permalinks: Maps archive types to the permalink format used for archive pages.
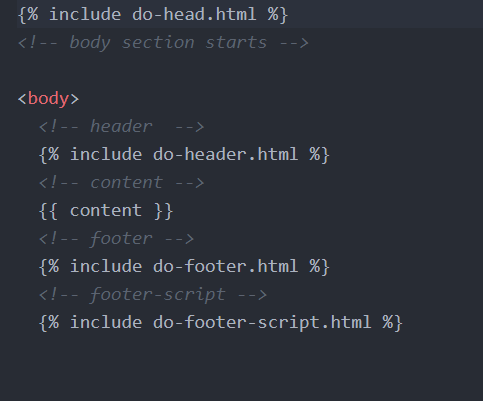
Header
- Stocky Header is created as an include, which is included in _layout > default.
- Include variable for header is
{% include do-header.html %} - Stocky Header consists of 4 items: Logo/Site Title, Menu, Account & Cart.
- Logo/Site Title: You can add logo and it's width in _config.yml > Logo & Favicon Settings tab. Click here for more information.
- Menu: To add in header menu, _data > do-menu.yml. Click here for more information.
- Account: Account holds the link for login and signup pages.
- Cart: The cart will take you to the checkout page.

Menu
Menu YML File
To add data on menu.
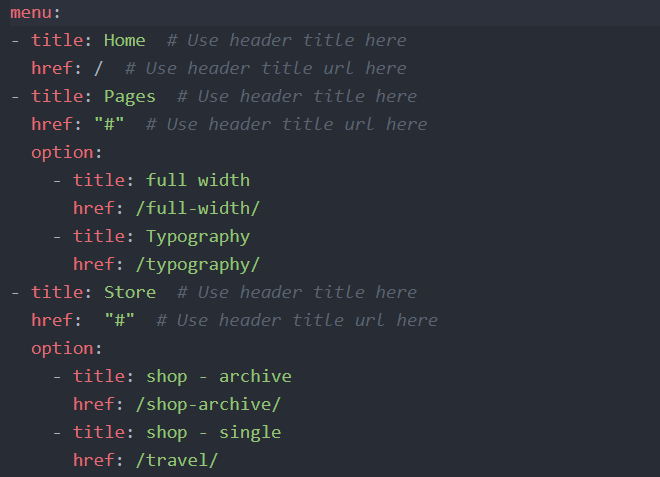
- title: title denotes menu's name.
- href: href denotes links for title.
- options: Array of option defines the dropdown.
- title: title denotes dropdown's menu name.
- href: href denotes links for dropdown's title.
This yml's value will be used on {% include do-header.html %} and this do-header.html is included on the layout.
Footer
- Stocky Footer is created as an include, which is included in _layout > default.
- Include variable for footer is
{% include do-footer.html %} - Stocky Footer consists of 3 items: Footer Widgets, Social Networks and Copyright & Credit.

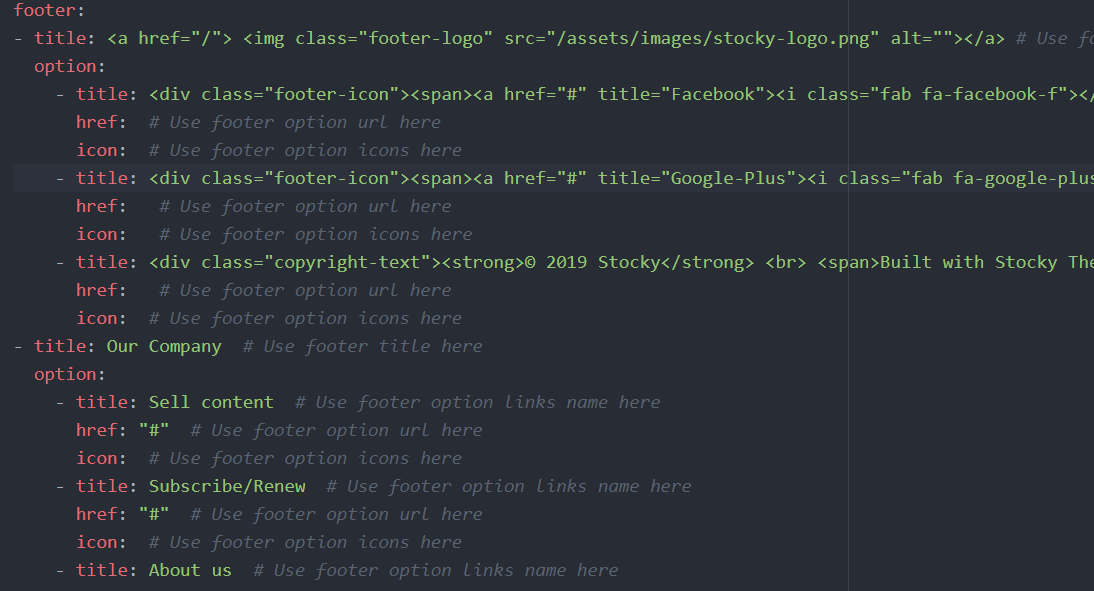
Footer YML File
- To create Footer YML file, On jekyll go to _data > and right click on it and click'create a new file' option. Enter the Menu name.
- title: title denotes menu's name.
- options: Array of option defines the dropdown.
- title: title denotes dropdown's menu name.
- href: href denotes links for dropdown's title.
- icon: If you add an icon, it will displays before the title.
Includes
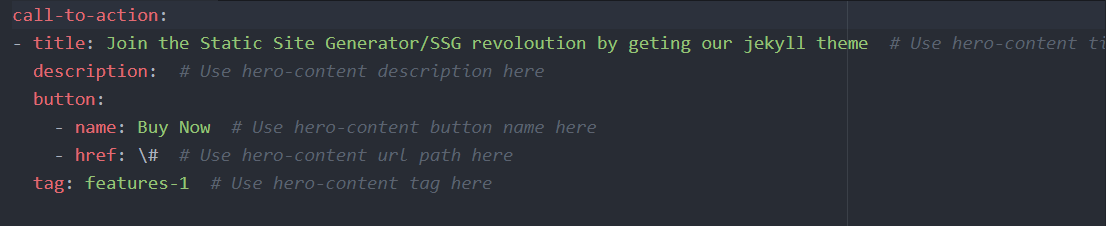
Call To Action
Description
Call to action is an include, which contain some text and a button.

How to add content
- In _data > do-call-to-action.yml
- title: Title for the call to action.
- description: Content for the call to action.
- button: It has the button attributes.
- name: Name of the button is used here.
- href: Link for the button is used here
- tag: Tag for the call to action. (Mandatory)
How to add on page
- It can be used by
- Attributes
- Tag (Mandatory)
- Tag is a Mandatory attribute without using tag call to action will not be displayed.
- Button-alignment
- right (default) the button displays on right side.
- bottom the button displays to the bottom of the content.
{% include do-call-to-action.html tag="features-1" button-alignment="bottom"%}
Forgot Password
Description
Forgot Password is an form used to get a code incase of forgetting password for an existing user, which can be embeded anywhere in the page as include.
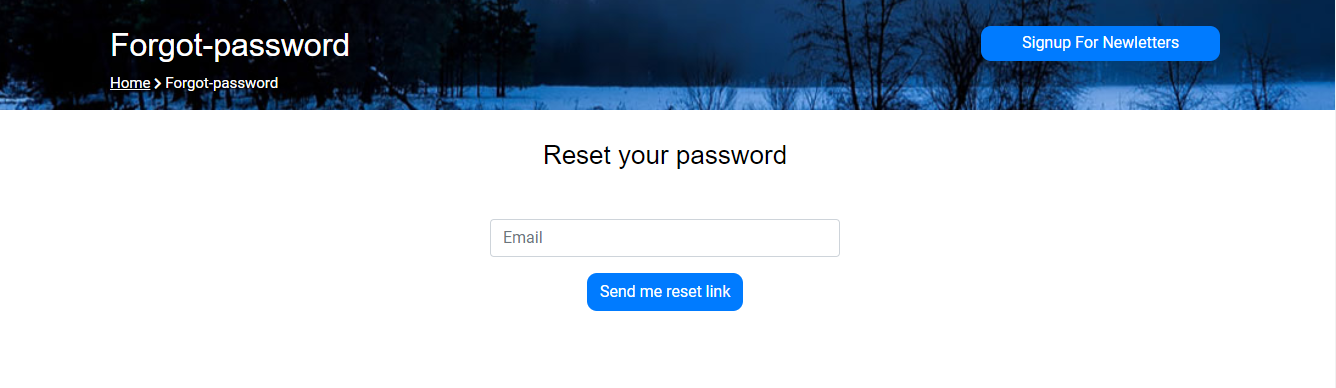
How to add on page
- It can be used by
{% include do-forgot-password.html %}
Form
Description
Form is an html block which provides the user to contact the owner of the site with its available elements. This form is just a example one which you can embed on your site.
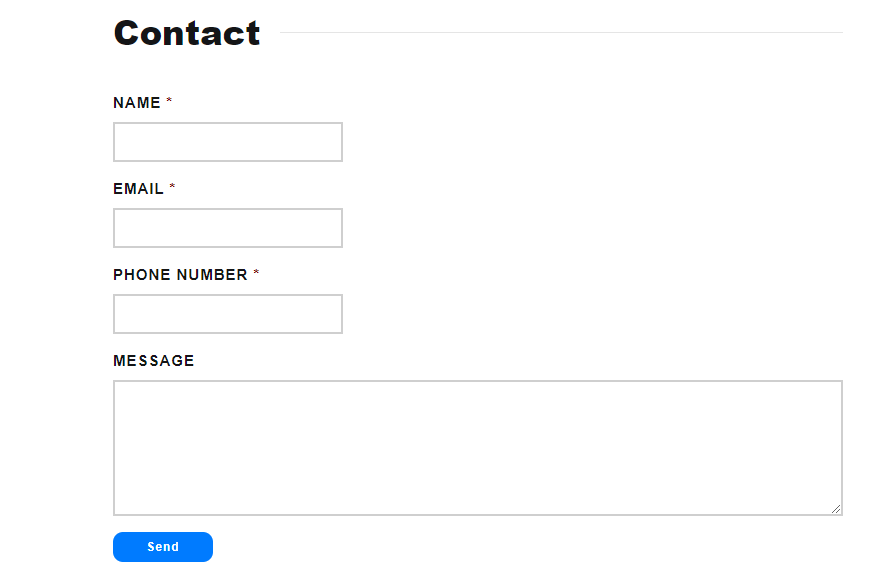
How to add on page
- It can be used by
{% include do-form.html %}
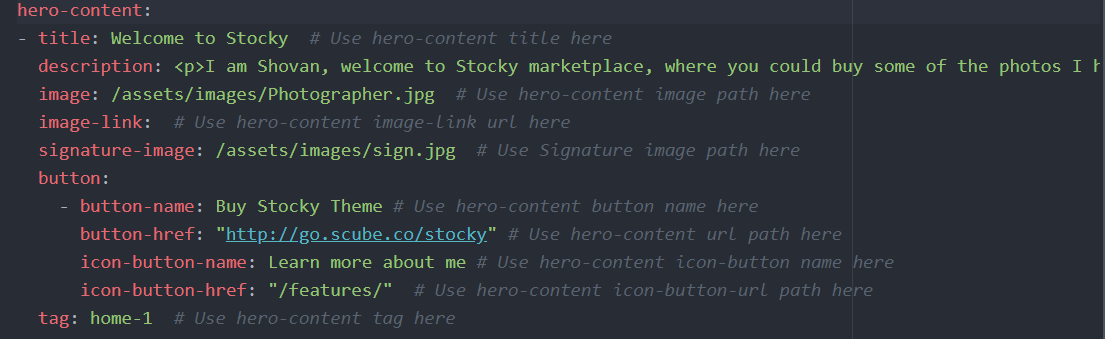
Hero Content
Description
The section contains two columns one with image and other with text. Text column contains some spacing before and after.

How to add content
- In _data > do-hero-content.yml
- title: Title for the text column.
- description: Description text.
- image:This image will popup when image url is empty.
- image-link:If you click on the image it'll redirect to this url.
- signature-image:This image will be displayed below the button.
- button:
- button-name: Text for the button with background colour.
- button-href: link for the button with background colour.
- icon-button-name Text for the icon button.
- icon-button-href link for the icon button.
- tag: Tag name is used in page to add the hero content. (Mandatory)
How to add in page
- It can be used by
- Attributes
- Tag (Mandatory)
- Tag is a Mandatory attribute without using tag hero content will not be displayed.
- Layout (Mandatory)
- image-left: Image displays on left column.
- image-right: Image displays on right column.
- Layout is a Mandatory attribute without using layout hero content will not be displayed.
- Vertical alignment
- top: Content aligned to top of the column.
- center (default): Content aligned to the center of the column.
- bottom: Content aligned to the bottom of the column.
{% include do-hero-content.html tag="home-1" layout="image-right" vertical-alignment="center" %}
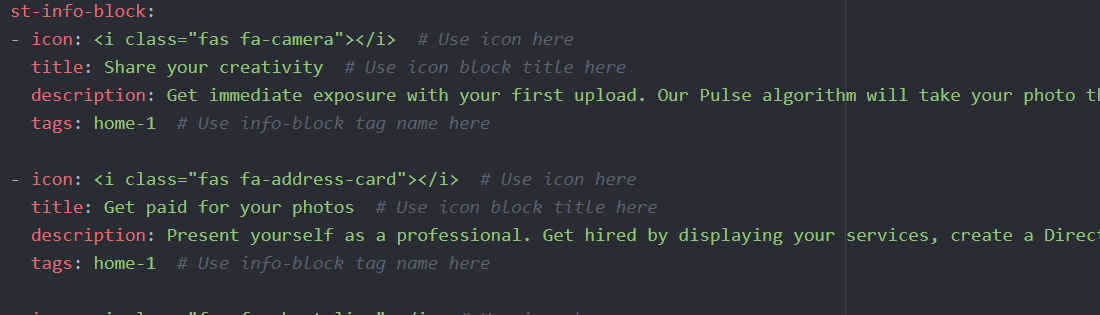
Info Block
Description
The section contains an image, title and text.

How to add content
- In _data > do-info-block.yml.
- icon: Icon for the Info Block.
- title: Title for the Info Block.
- description: Description text.
- tag: Tag name is used in page to add the info block. (Mandatory)
How to add in page
- It can be used by
- Attributes
- Tag (Mandatory)
- Tag is a Mandatory attribute without using tag info block will not be displayed.
- Laptop
- Number of columns for laptop devices can be used here. (Default column 4)
- Tablet
- Number of columns for tablet devices can be used here. (Default column 2)
- Mobile
- Number of columns for mobile devices can be used here. (Default column 1)
- Content Alignment
- left (default): Content Aligned to left.
- center: Content Aligned to Center.
- right: Content Aligned to Right.
{% include do-info-block.html tag="home-1" laptop=3 tablet=3 mobile=1 content-alignment="left"%}
Login
Description
Login is an include form which consist of a user name and password, which can be embeded anywhere in the page for authentication purpose.
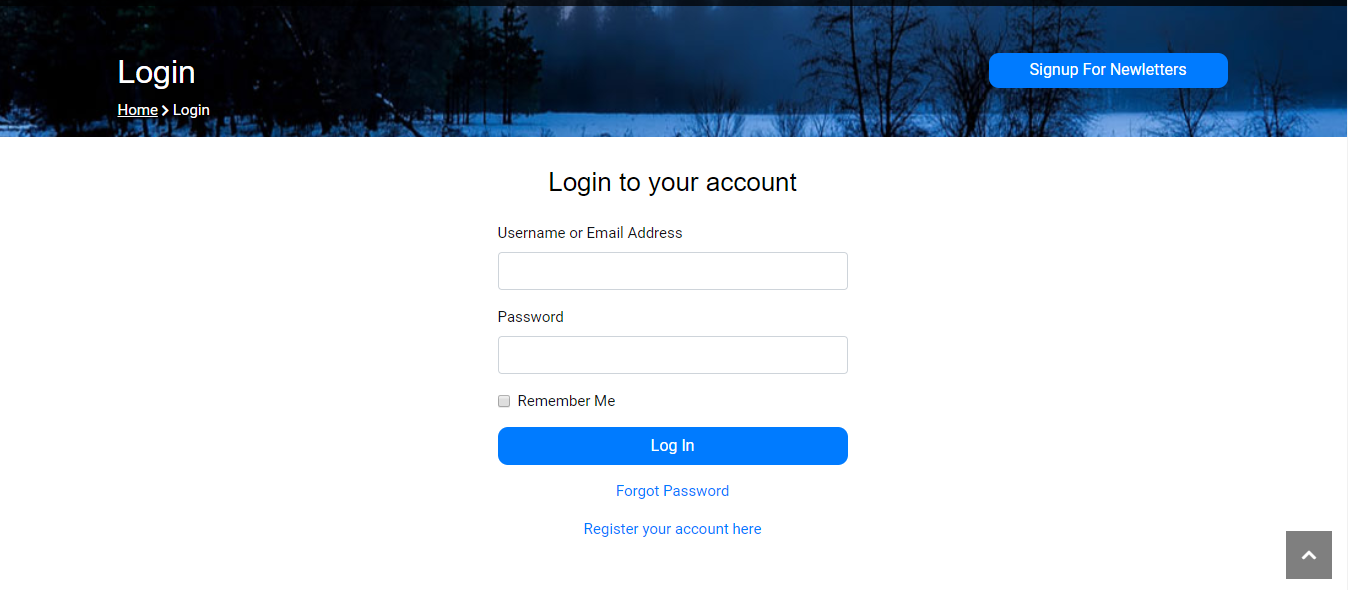
How to add in page
- It can be used by
{% include do-login.html %}
Page Banner
Description
Page banner occupies the top section of the page which shows the breadcrumbs for each page with page title and a background image. Additonally it consist of a link with a button for signing up newsletters for your website

How to add in page
- It can be used by
- Page banner is used on top of the page layout in this theme.
{% include do-page-banner.html %}
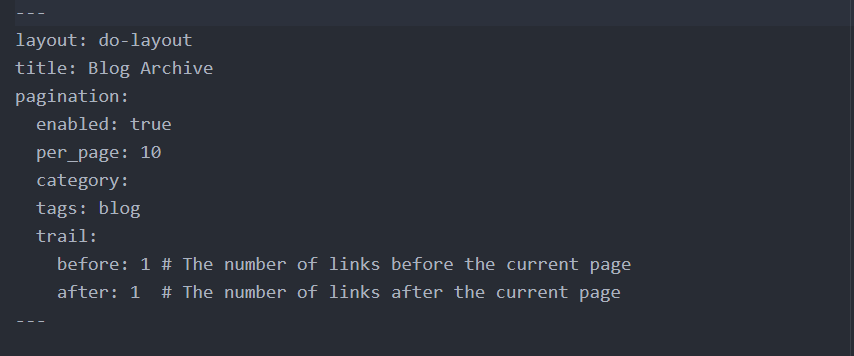
Pagination
Description
Pagination is the sequence of numbers assigned to pages in a book. Each page can have multiple articles. Inorder to use pagination, Enable pagination in _config.yml. Click here for more information.
How to add in page
- It should be added on page's front matter.
- enabled: page kill switch, disabled here it doesn't run this page. Enabled to use pagination.
- per_page: how many objects per paginated page.
- category: Pagination will obatain post based on the provided category.
- tags: Pagination will obtain post based on the provided tag.
- trail: Number of links before and after the current page.
- before: The number of links before the current page.
- after: The number of links after the current page.
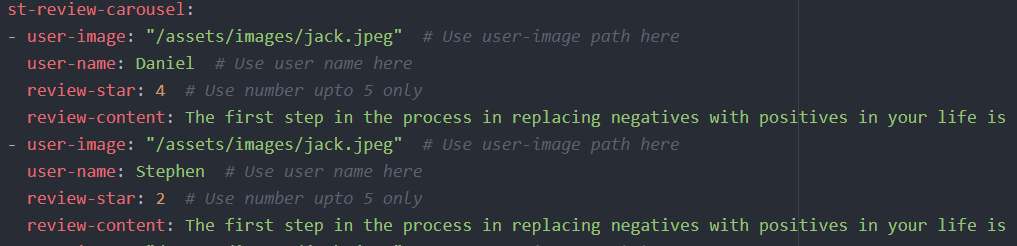
Review Carousel
Description
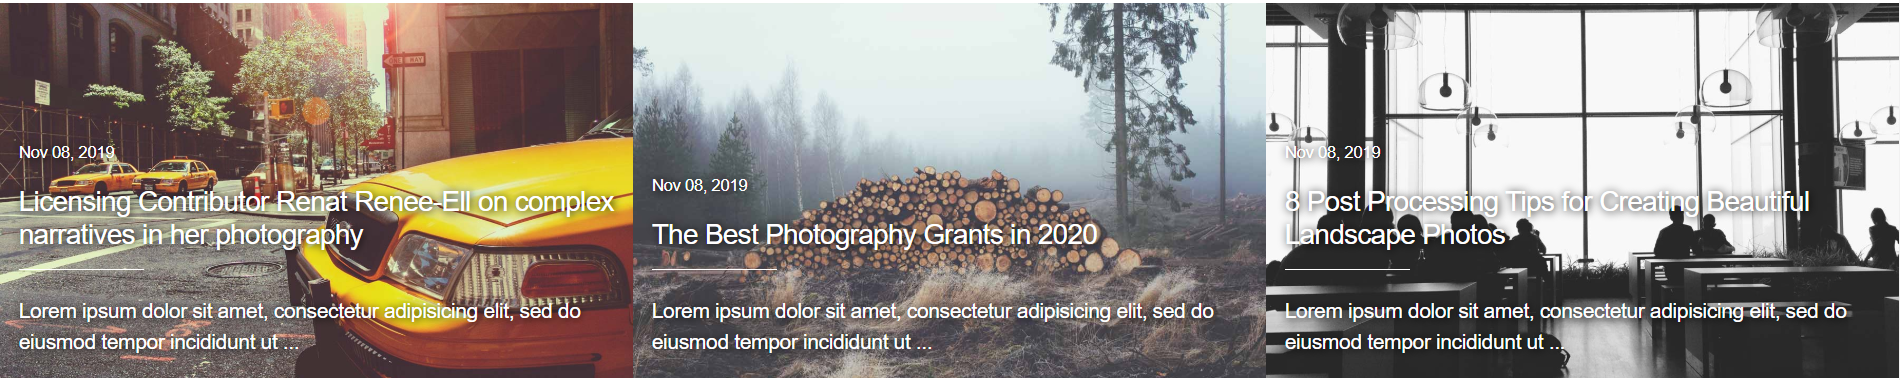
This sections shows reviews about the user. It contains users name, image, user-rating and review
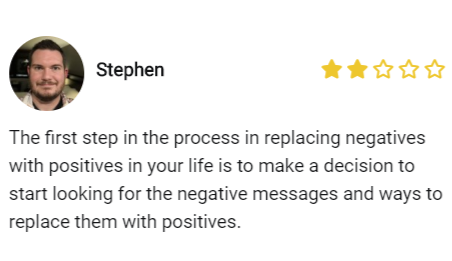
How to add content
- In _data > do-review-carousel.yml
- user-image: Image of the user.
- user-name: Name of the user.
- review-star: Rating of the user.
- review-content: Review content by the user.
How to add in page
- It can be used by
- It can been used for product review.
{% include do-review-carousel.html %}
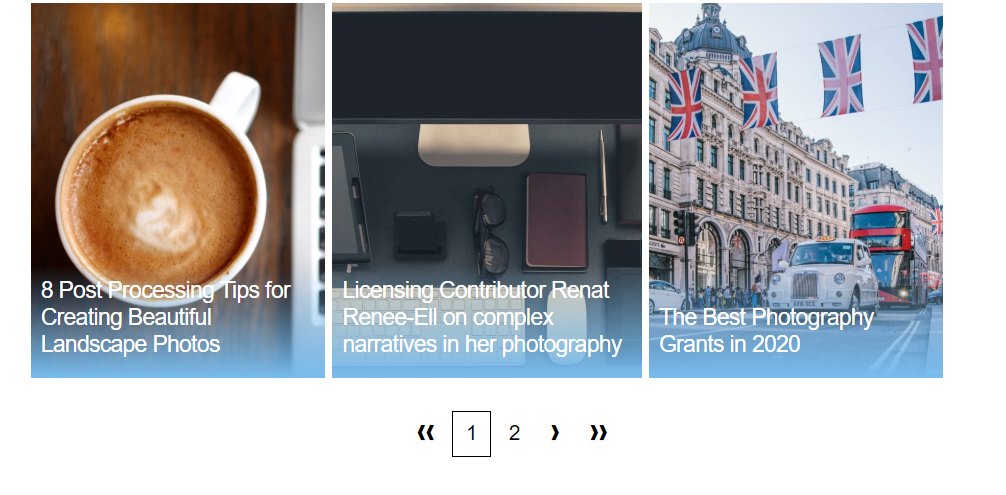
Shop Image Archive
Description
Shop Image Archive shows the product's archive.
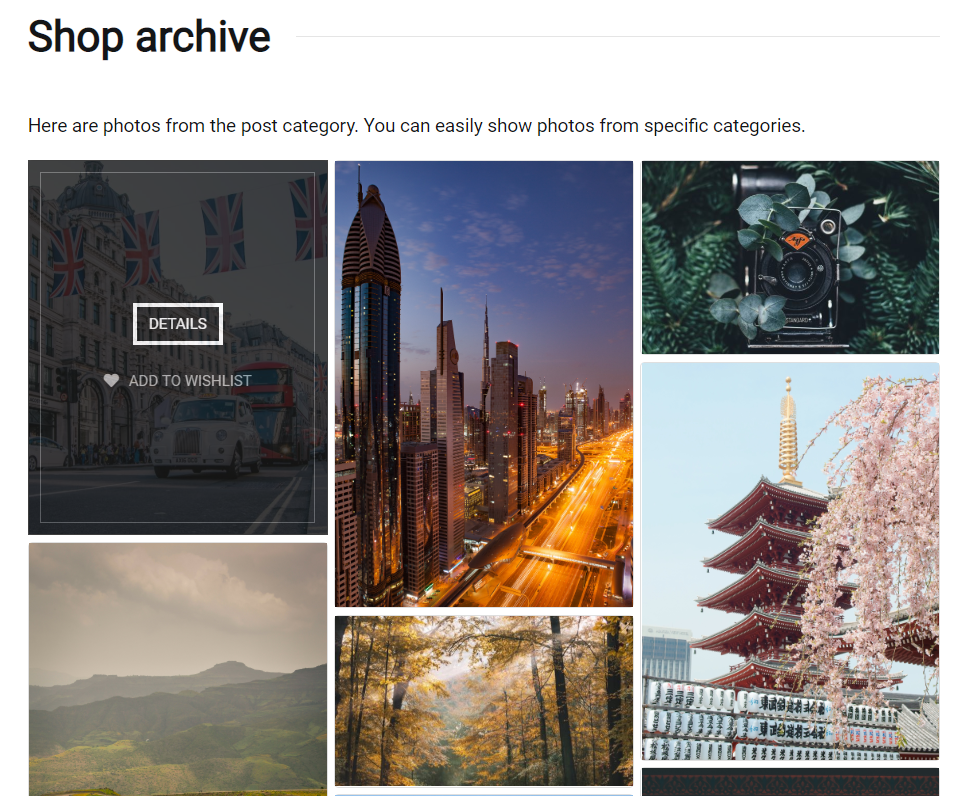
How to add in page
- It can be used by
{% include do-shop-image-archive.html %}
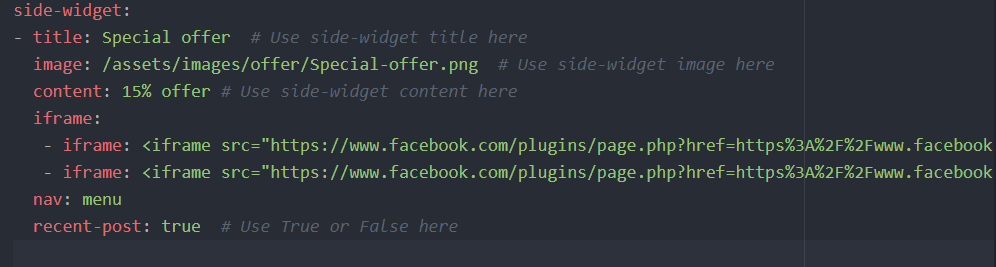
Side Widget
Description
This section displays a variety of information to the right or left side of web page.
How to add content
- In _data > do-side-widget.yml
- title: Title of the First widget.
- image: Image for the First widget.
- content: Content for the First widget.
- iframe: Array of iframe denotes social media feed.
- iframe: Iframe for social media.
- nav: Displaying nav-bar menu on Widget.
- recent-post: Displaying recent post on Widget.
How to add in page
- It can be used by
- It has been used on page for various layouts on this theme.
{% include do-sidewidget.html %}
Signup
Description
Signup is an form which can be embeded as a user register form on any page.
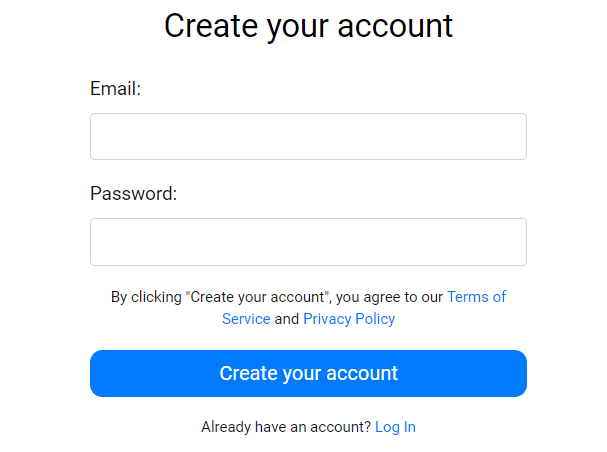
How to add in page
- It can be used by
{% include do-signup.html %}
File structure
- A jekyll site consist of these following directories and files.
- Jekyll directories
- _data
- _includes
- _layouts
- _posts
- _sass
- _site
- assets
- Jekyll files
- _config.yml
- Gemfile
- Gemfile.lock
Jekyll Directories
- _data
- Well-formatted site data should be placed here. The Jekyll engine will autoload all data files (using either the .yml, .yaml, .json, .csv or .tsv formats and extensions) in this directory, and they will be accessible via `site.data`. If there's a file menu.yml under this directory, then you can access contents of the file through site.data.menu.
- In order work with this directory you should have a clear knowledge with .yml, .yaml, .json, .csv, .tsv
- _includes
- These are the partials that can be mixed and matched by your layouts and posts to facilitate reuse. The liquid tag
{% include do-header.html %}can be used to include the partial in _includes/header.html - Includes are very useful and it completly removes code redundancy.
- With includes one can create a file once and use anywhere without repeating the same blocks of codes.
- _layouts
- These are the templates that wrap posts and pages. Layouts are chosen on a post-by-post and page-by-page basis in the front matter. The liquid tag {{ content }} is used to inject content into the web page.
- This theme has used several layouts for different page structures and post individuals structures.
- Front Matter
- Any file that contains a YAML front matter block will be processed by Jekyll as a special file. The front matter must be the first thing in the file and must take the form of valid YAML set between triple-dashed lines. Here is a basic example:
- _posts
- Your dynamic content, so to speak. The naming convention of these files is important, and must follow the format: YEAR-MONTH-DAY-title.MARKUP. The permalinks can be customized for each post, but the date and markup language are determined solely by the file name.
- Your post can be organized by directories as categories or tags.
- These tags, categories and all post values can be provided through post front matter and are displayed with their layouts.
- Post can be accesed through 'site.posts' variable.
- Permalinks
- Permalinks are the output path for your pages, posts, or collections. They allow you to structure the directories of your source code different from the directories in your output.
- _sass
- These are sass partials that can be imported into your main.scss which will then be processed into a single stylesheet main.css that defines the styles to be used by your site.
- All css packages can be combined into a package with this sass directory.
- _site
- This is where the generated site will be placed (by default) once Jekyll is done transforming it.
- assets
- Assets directory consist of all the css, js, images and other packages for your site.
- Click here for more information.
Jekyll Files
- _config.yml
- Stores configuration data. Many of these options can be specified from the command line executable but it’s easier to specify them here so you don’t have to remember them.
- Jekyll gives you a lot of flexibility to customize how it builds your site. These options can either be specified in a _config.yml or _config.toml file placed in your site’s root directory, or can be specified as flags for the jekyll executable in the terminal.
- Gemfile
- A Gem is a bundle of code which can be include in Ruby projects. This allows us to take someone else’s code and drop it into our own project.
- Jekyll itself is a Gem as well many Jekyll plugins including jekyll-feed, jekyll-pagination, jekyll-seo-tag and jekyll-archives.
- A Gemfile is Ruby’s dependency management system or in other words, a list of Gems a Ruby project needs to run. We use Gemfiles on Jekyll sites when we have Jekyll plugins.
- A Gemfile requires at least one source which tells us where to download the Gems. Unless we have an advanced use case rubygems.org will be fine.
- Next specify the Gems we’re using. We can include a version number if want a specific version. It’s important to always include Jekyll in our Gemfile.
- Usually we’d have to also specify our plugin Gems in _config.yml so Jekyll knows about them. We can avoid this by putting our plugin Gems in a “jekyll_plugins” group which Jekyll includes automatically.
- Gemfile.lock
- When we create or change a Gemfile, we need to run bundle install which performs two tasks:
- Creates a Gemfile.lock file if it doesn’t exist. This file is auto-generated and includes all the Gems in Gemfile with the addition of a version number even if it wasn’t specified. This ensures that other people we share the source code to will have the same version of the gems.
- Downloads the gems in Gemfile.lock.
- Usually when we run jekyll we’d do something like this:
- jekyll serve
- When we’re using a Gemfile we need to run Jekyll slightly differently. We might have multiple versions of the jekyll-feed plugin on our machine and if we run jekyll serve, it might use the wrong version. We can solve this using bundle exec which makes only the Gems in the Gemfile available. For example if we want to run jekyll serve we’d run:
- bundle exec jekyll serve
- Click here for more details
Troubleshoot
- After downloading the package we have run 'jekyll serve' on the terminal to run jekyll server.
- If you found any errors or bugs run 'bundle install' to update missing gems for jekyll.
- After doing 'bundle install' it will install all the dependency for the jekyll.
- Try 'jekyll serve' to run the jekyll server. If any error occurs in dependency files try 'bundle exec jekyll serve'.
- It will fix the dependencies and run the server.
Known Bugs and errors
- Home page
- Logo carousel glitch, which gives a shake when refreshing the page.
- Category should not be two words and if you want to use two words use hyphens to separate them.
- Footer
- Footer cannot be added with 5 columns, suppose if you use five columns it will display 6 columns instead of 5 columns
- Author page
- There is no separate author archive page in jekyll archive plugin.
- Search form
- Search form do not work on header and home page.
Stocky - A Photography Marketplace Theme

Stocky Jekyll is a Jekyll photography marketplace theme, that provides you with pages required to setup a digital marketplace.
Thank you for purchasing the theme. We provide support for all of our themes at http://go.scube.co/stocky-js, but please make sure you read this documentaion in it's entirety first.
Thanks again!